Difference between revisions of "AHM2009:JHU"
Sidd queens (talk | contribs) |
|||
| (One intermediate revision by one other user not shown) | |||
| Line 58: | Line 58: | ||
The steps in the workflow are as follows: | The steps in the workflow are as follows: | ||
#'''Calibration:''' | #'''Calibration:''' | ||
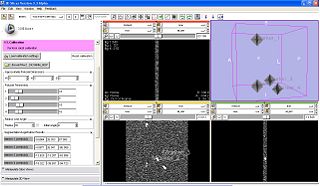
| − | #:This is the first step in workflow. The objective is to register the image to the robot via MR fiducials. For this, first a MR scan (calibration volume) is done to optimally image the fiducials. The volume is loaded up inside SLICER, from the TR Prostate Biopsy module's wizard GUI. The registration method is based on first segmenting the fiducials as seen in image. The segmentation algorithm developed by Csaba/Axel at Johns Hopkins, primarily uses morphological operations to localize the fiducials. The parameters of segmentation are available on wizard GUI; these include: approximate physical dimensions of fiducials, thresholds. The semi-automatic segmentation process is initiated by user providing one click each per fiducial. After the fiducials are segmented, the registration is triggered automatically inside, which uses prior knowledge about mechanical design of the device, and knowledge of placement of fiducials. The registration algorithm finds two axis lines (one per pair of fiducials), and computes the angle and distance between those axes. The segmentation, and registration results are displayed in GUI. The registration results (angle and distance between axes) are bench-marked against the mechanically measured ground truth. If the user/clinician | + | #:This is the first step in workflow. The objective is to register the image to the robot via MR fiducials. For this, first a MR scan (calibration volume) is done to optimally image the fiducials. The volume is loaded up inside SLICER, from the TR Prostate Biopsy module's wizard GUI. The registration method is based on first segmenting the fiducials as seen in image. The segmentation algorithm developed by Csaba/Axel at Johns Hopkins, primarily uses morphological operations to localize the fiducials. The parameters of segmentation are available on wizard GUI; these include: approximate physical dimensions of fiducials, thresholds. The semi-automatic segmentation process is initiated by user providing one click each per fiducial. After the fiducials are segmented, the registration is triggered automatically inside, which uses prior knowledge about mechanical design of the device, and knowledge of placement of fiducials. The registration algorithm finds two axis lines (one per pair of fiducials), and computes the angle and distance between those axes. The segmentation, and registration results are displayed in GUI. The registration results (angle and distance between axes) are bench-marked against the mechanically measured ground truth. If the user/clinician is not happy with the results, he/she can modify the parameters and do re-segmentation and recalculate registration.[[Image:TRProstateBiopsy Calibration.JPG|thumb|320px|center|Calibration step GUI.]] |
#'''Segmentation:''' | #'''Segmentation:''' | ||
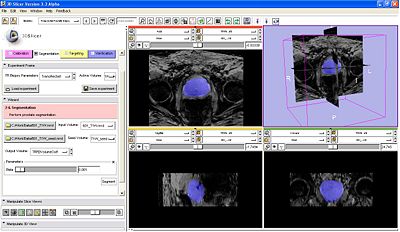
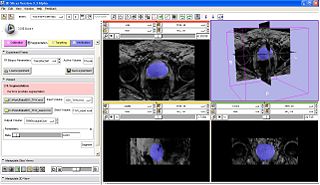
#:After the robot is registered, the next step (press next on wizard workflow) is to acquire prostate volume, and segment prostate (Algorithm by Yi Gao/ Allen Tannenbaum GeorgiaTech)[[Image:TRPB_ProstateSegmentation.JPG|thumb|320px|center|Segmentation.]] | #:After the robot is registered, the next step (press next on wizard workflow) is to acquire prostate volume, and segment prostate (Algorithm by Yi Gao/ Allen Tannenbaum GeorgiaTech)[[Image:TRPB_ProstateSegmentation.JPG|thumb|320px|center|Segmentation.]] | ||
| − | #'''Registration (MR1, MR2,...MRSI -- | + | #'''Registration:''' |
| + | #: (MR1, MR2,...MRSI -- work in progress | ||
#'''Targeting:''' | #'''Targeting:''' | ||
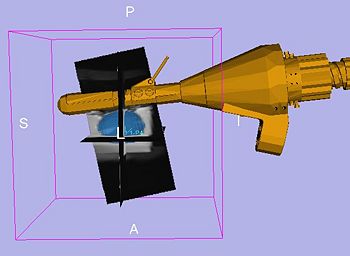
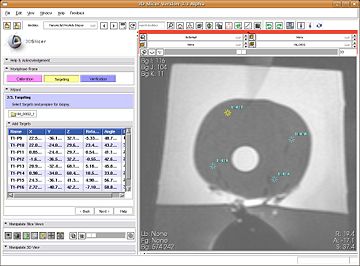
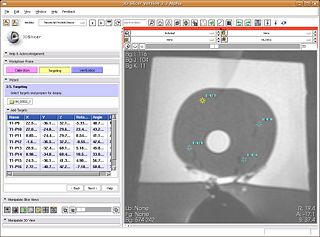
#:In this step, clinician marks biopsy targets (by click). The robot rotation angle and needle angle is computed along-with needle trajectory and depth (automatically). The information about the target's RAS location, and the needle targeting parameters is populated in the list in wizard GUI. Selecting a particular target in the list brings the target in view in all three slices. Multiple targets can be marked. The clinician selects the target to perform biopsy on. The clinician then dials in the rotation angle, and needle angle on the device, and performs the biopsy. The sensor data from the optical encoders on the robot is continuously read and updated on the SLICER's slice views, about the current depth/orientation of needle. [[Image:TRProstateTargeting.jpg|thumb|320px|center|Trajectory calculation from target locations]] | #:In this step, clinician marks biopsy targets (by click). The robot rotation angle and needle angle is computed along-with needle trajectory and depth (automatically). The information about the target's RAS location, and the needle targeting parameters is populated in the list in wizard GUI. Selecting a particular target in the list brings the target in view in all three slices. Multiple targets can be marked. The clinician selects the target to perform biopsy on. The clinician then dials in the rotation angle, and needle angle on the device, and performs the biopsy. The sensor data from the optical encoders on the robot is continuously read and updated on the SLICER's slice views, about the current depth/orientation of needle. [[Image:TRProstateTargeting.jpg|thumb|320px|center|Trajectory calculation from target locations]] | ||
#'''Verification:''' | #'''Verification:''' | ||
| − | #:After, the needle is in, a confirmation scan is taken to verify actual biopsy locations against the planned targets. The verification volume is loaded in SLICER from module GUI. The user picks up the target to validated from the list, and then clicks at two needle ends to mark the needle. The distance and angle errors are calculated and populated in the list. [ | + | #:After, the needle is in, a confirmation scan is taken to verify actual biopsy locations against the planned targets. The verification volume is loaded in SLICER from module GUI. The user picks up the target to validated from the list, and then clicks at two needle ends to mark the needle. The distance and angle errors are calculated and populated in the list. [Work in progress...] |
Currently, we have implemented the GUI of all the steps in workflow. The functionality of calibration step is complete. The functionality of segmentation step is being implemented during the project week, working in coordination with Yi/Allen. We are in the process of implementing functionality for the rest of steps. | Currently, we have implemented the GUI of all the steps in workflow. The functionality of calibration step is complete. The functionality of segmentation step is being implemented during the project week, working in coordination with Yi/Allen. We are in the process of implementing functionality for the rest of steps. | ||
Latest revision as of 15:25, 8 January 2009
Home < AHM2009:JHU
JHU Roadmap Project
Overview
- Who is the targeted user?
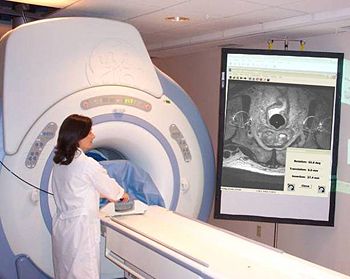
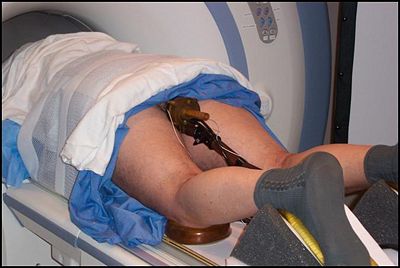
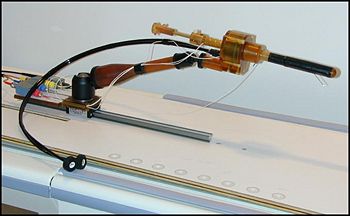
The only definitive method to diagnose prostate cancer is to perform biopsy. The current gold standard is Trans Rectal UltraSound (TRUS) guided biopsies. TRUS biopsies lack in sensitivity and specificity. MRI has recently been investigated as an attractive alternative to image and localize prostate cancer. It is imperative to take advantage of multi-parametric MRI imaging to perform prostate biopsy. However, to perform MRI-guided biopsy, there is a physical limitation of working in a very small space. We have developed a completely MR-compatible robot that solves the problem. This SLICER based module we are developing, aims to provide end-to-end interventional solution that combines software imaging functionality and interfaces with our specific hardware to perform the biopsy. The targeted users are the clinicians who are currently investigating our MRI compatible robotic device.
- What problem does the pipeline solve?
There are several Slicer features that are crucial to image-guided therapy that are utilized in this module:
Oriented volumes and image slice reformatting Each volume acquired during the biopsy procedure has its own orientation, since images are acquired according to the orientation of the instrument, which is at an oblique angle to the MR scanner's coordinate axes. What we have added is that, for each workflow step, a particular volume is specified as the "primary" and, when overlays are performed e.g. for verification, Slicer displays the primary image in its original orientation and reslices the others. The displayed slice orientation automatically changes to match the primary whenever the workflow step changes.
Multiple fiducial lists This module maintains two Slicer fiducial lists: for registration, and for targeting. Like the image orientation, we have added automatic switching between display of fiducials according to the workflow step.
Communication with hardware devices The module uses optical encoders that are attached to the joints of the biopsy device to verify that the position of the device matches that of the plan.
- How does the pipeline compare to state of the art?
SLICER's ability to work with volumes, slice reformatting, and seamless integration with image analysis algorithms makes it uniquely suited to our problem. One does not have to reinvent the wheel, as there is so much functionality that is available at hand and easily accessible as plug and play components. There is an existing pipeline/application that interfaces with our specific hardware, however, it is rather difficult to extend its functionality to cater near future requirements. So, we believe SLICER module is the way to go for us.
Detailed Information about the Pipeline
We have created an interactive loadable module that provides a workflow interface for MR-guided transrectal prostate biopsy. The MR images are captured with the help of an endorectal coil which is mounted on the same shaft as the biopsy needle. The steps in the workflow are as follows:
- Calibration:
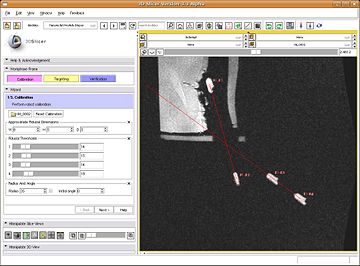
- This is the first step in workflow. The objective is to register the image to the robot via MR fiducials. For this, first a MR scan (calibration volume) is done to optimally image the fiducials. The volume is loaded up inside SLICER, from the TR Prostate Biopsy module's wizard GUI. The registration method is based on first segmenting the fiducials as seen in image. The segmentation algorithm developed by Csaba/Axel at Johns Hopkins, primarily uses morphological operations to localize the fiducials. The parameters of segmentation are available on wizard GUI; these include: approximate physical dimensions of fiducials, thresholds. The semi-automatic segmentation process is initiated by user providing one click each per fiducial. After the fiducials are segmented, the registration is triggered automatically inside, which uses prior knowledge about mechanical design of the device, and knowledge of placement of fiducials. The registration algorithm finds two axis lines (one per pair of fiducials), and computes the angle and distance between those axes. The segmentation, and registration results are displayed in GUI. The registration results (angle and distance between axes) are bench-marked against the mechanically measured ground truth. If the user/clinician is not happy with the results, he/she can modify the parameters and do re-segmentation and recalculate registration.
- Segmentation:
- After the robot is registered, the next step (press next on wizard workflow) is to acquire prostate volume, and segment prostate (Algorithm by Yi Gao/ Allen Tannenbaum GeorgiaTech)
- Registration:
- (MR1, MR2,...MRSI -- work in progress
- Targeting:
- In this step, clinician marks biopsy targets (by click). The robot rotation angle and needle angle is computed along-with needle trajectory and depth (automatically). The information about the target's RAS location, and the needle targeting parameters is populated in the list in wizard GUI. Selecting a particular target in the list brings the target in view in all three slices. Multiple targets can be marked. The clinician selects the target to perform biopsy on. The clinician then dials in the rotation angle, and needle angle on the device, and performs the biopsy. The sensor data from the optical encoders on the robot is continuously read and updated on the SLICER's slice views, about the current depth/orientation of needle.
- Verification:
- After, the needle is in, a confirmation scan is taken to verify actual biopsy locations against the planned targets. The verification volume is loaded in SLICER from module GUI. The user picks up the target to validated from the list, and then clicks at two needle ends to mark the needle. The distance and angle errors are calculated and populated in the list. [Work in progress...]
Currently, we have implemented the GUI of all the steps in workflow. The functionality of calibration step is complete. The functionality of segmentation step is being implemented during the project week, working in coordination with Yi/Allen. We are in the process of implementing functionality for the rest of steps. This module provides a demonstration of how Slicer modules can be created for specific interventional devices.
Software & documentation
- The TRProstateBiopsy module is in the "Queens" directory of the NAMICSandBox - access online
- Tutorial is forthcoming
Team
- DBP:
- Core 1: Allen Tannenbaum, Phd, Yi Gao, Phd student, Georgia Tech University

- Core 2: Steve Pieper, Katie Hayes

- Contact: Gabor Fichtinger, gabor at cs.queensu.ca
Outreach
- Publication Links to the PubDB.
- Planned outreach activities (including presentations, tutorials/workshops) at conferences
