Difference between revisions of "Projects:ARRA:SlicerEM:AtlasCreator"
(→Design) |
|||
| Line 34: | Line 34: | ||
To configure an Atlas Creator operation, we introduce configuration containers. The following example shows how to create the configuration: | To configure an Atlas Creator operation, we introduce configuration containers. The following example shows how to create the configuration: | ||
<pre> | <pre> | ||
| − | + | # configuration for a Normal Mode operation | |
| − | + | configuration = AtlasCreatorConfiguration() | |
| − | + | # define the parameters | |
| − | + | configuration.SetTemplateType("fixed") | |
| − | + | ... | |
| − | + | self._logic.Start(configuration) | |
| − | + | # configuration for a Cluster Mode operation | |
| − | + | gridConfiguration = AtlasCreatorGridConfiguration() | |
| − | + | # define the same parameters as above | |
| − | + | gridConfiguration.SetTemplateType("fixed") | |
| − | + | ... | |
| − | + | # and also additional cluster specific parameters | |
| − | + | gridConfiguration.SetSchedulerCommand("stageClusterJob.sh") | |
| − | + | ... | |
| − | + | self._logic.Start(configuration) | |
</pre> | </pre> | ||
| − | The logic detects which operation scenario was configured and then adjusts the workflow accordingly. | + | The logic detects which operation scenario was configured and then adjusts the workflow accordingly. This concept can be extended for future operation modes. |
=== Proposal: Running the Atlas Creator in a Grid Environment === | === Proposal: Running the Atlas Creator in a Grid Environment === | ||
Revision as of 22:15, 3 February 2011
Home < Projects:ARRA:SlicerEM:AtlasCreatorAtlas Creator
The Atlas Creator combines existing segmentations to an anatomical atlas based on robust statistics.
GUI
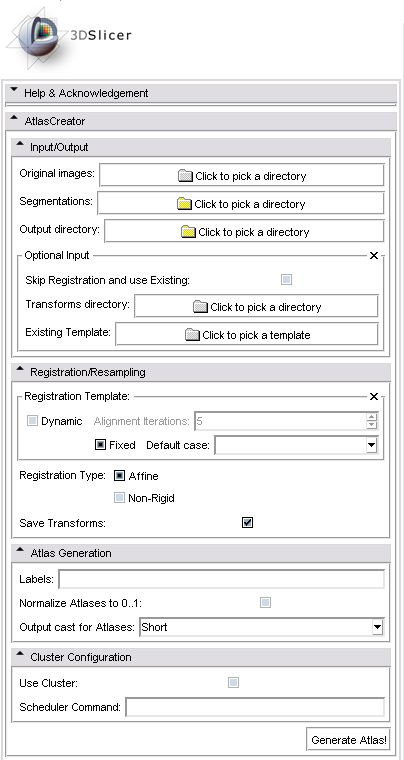
The following screenshot shows the graphical user interface of the Atlas Creator module in 3D Slicer Version 3.
Priority List
The priority list reflects the open issues.
- Re-structure Atlas Creator code according to the Design specified below
- Implement dynamic registration
- Watch out for overflows
- Implement support for parallel Computation
- Add Help and Online Documentation
- Include Shape Atlas functionality
Design
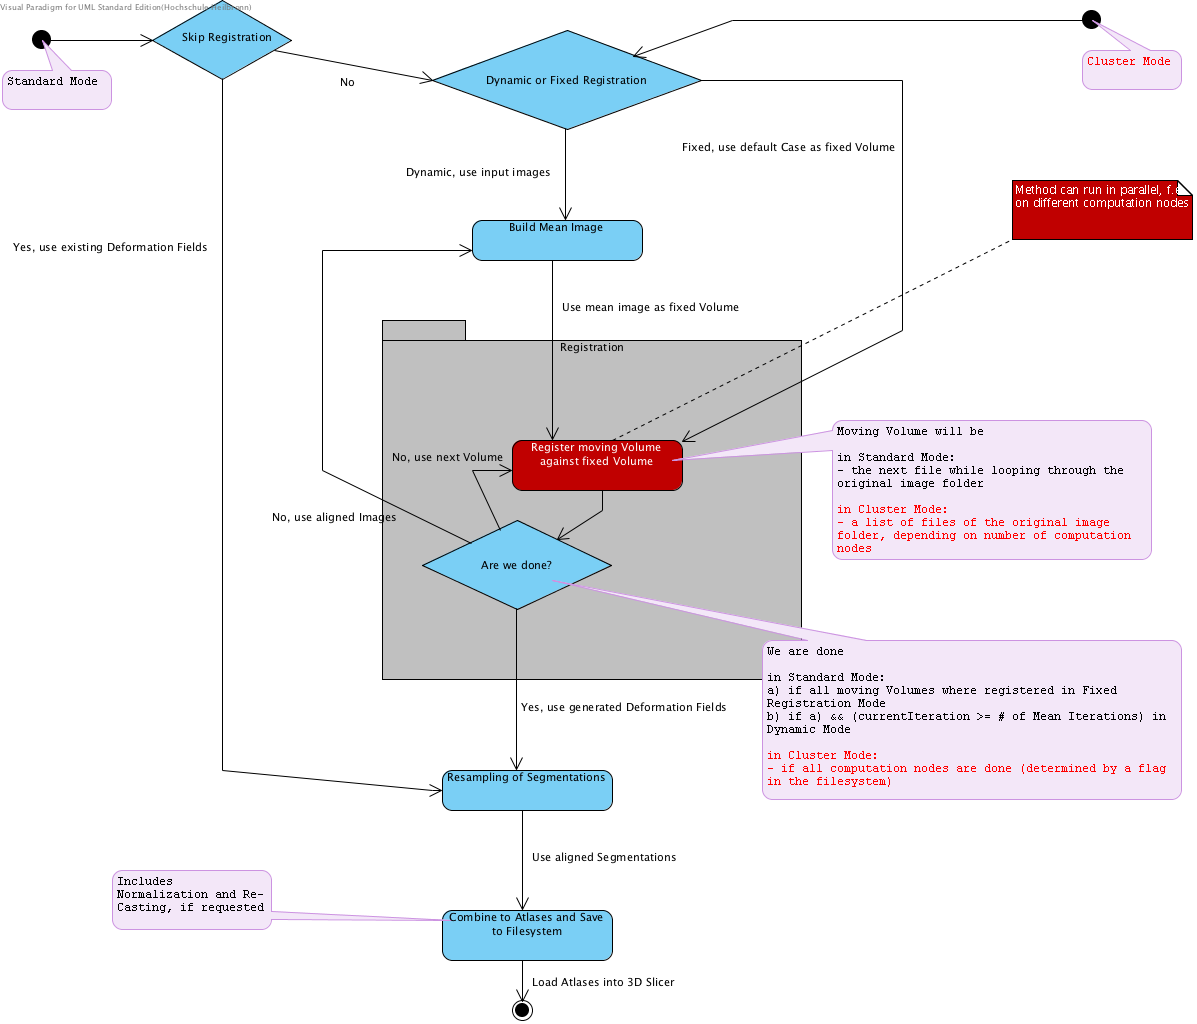
The following State Machine diagram shows the flow of the Atlas Creator logic. It can be run in two modes:
- Normal mode, all computations on one machine
- Cluster mode, parallelized computations
Proposal: Configuration of the Atlas Creator logic
The Atlas Creator supports different modes of operation. For now, we focus on Skip Registration Mode, Normal Mode and Cluster Mode.
To configure an Atlas Creator operation, we introduce configuration containers. The following example shows how to create the configuration:
# configuration for a Normal Mode operation
configuration = AtlasCreatorConfiguration()
# define the parameters
configuration.SetTemplateType("fixed")
...
self._logic.Start(configuration)

# configuration for a Cluster Mode operation
gridConfiguration = AtlasCreatorGridConfiguration()
# define the same parameters as above
gridConfiguration.SetTemplateType("fixed")
...
# and also additional cluster specific parameters
gridConfiguration.SetSchedulerCommand("stageClusterJob.sh")
...
self._logic.Start(configuration)
The logic detects which operation scenario was configured and then adjusts the workflow accordingly. This concept can be extended for future operation modes.
Proposal: Running the Atlas Creator in a Grid Environment
The Atlas Creator concept supports parallelized computations. An existing grid environment can be leveraged during the Registration phase as shown in the diagram above.
Only the Registration can be performed parallelized since it is the most time-consuming task in the Atlas Creator pipeline.
The Atlas Creator module runs on one node in the cluster (most likely the head node) and then generates bash scripts which start the registration using the 3D Slicer launch mechanism. These scripts can be run using an existing scheduler or a similar mechanism and use the Python invokation method shown in the section below. An existing $DISPLAY environment is not necessary for using the 3D Slicer launch mechanism.
The module immediately recognizes if the parallelized registration jobs are complete and then continues the pipeline on the node where the it was first started.
Input for Parallelized Computation
- Optional: Command for scheduling the generated bash scripts. This command will be run with the generated bash scripts as individual arguments.
- Optional: Path to 3D Slicer (must be a network installation reachable by each node)
- Optional: The temporary directory to be used by the 3D Slicer launch mechanism
- Optional: The config file directory to be used by the 3D Slicer launch mechanism
- The number of different computation nodes. The Atlas Creator will use this number to distribute the parallelized registration among the input images.
Proposal: Invoking the Atlas Creator via Python
The Atlas Creator logic can be invoked via Python. This includes running the Atlas Creator from Command Line and invoking the Atlas Creator from another 3D Slicer module or the 3D Slicer Python console.
To access the Atlas Creator logic, the following snippet is useful:
from Slicer import slicer

# get the path to the Atlas Creator module
pathToAtlasCreator = str(slicer.Application.GetModulePaths()) + '/AtlasCreator'

# add it to the python sys path
sys.path.append(pathToAtlasCreator)

# import the Atlas Creator module
from AtlasCreatorGUI import *

# instantiate the Atlas Creator gui, needed for debug statements on the console
# and automatically creates the logic
gui = AtlasCreatorGUI()

# get the Atlas Creator logic
logic = gui.GetMyLogic()

# work with the logic
# TODO: this will be updated when the API is finalized
# for example:
logic.GenerateAtlas(...)
Running the Atlas Creator from Command Line
The snippet from above can be saved as a Python script which can be directly run using the 3D Slicer launch environment.
To invoke, use the following command:
./Slicer3 -p Script.py

