Difference between revisions of "AHM2012-Slicer-Python"
| Line 2: | Line 2: | ||
== What is accessible via python== | == What is accessible via python== | ||
| + | === Qt === | ||
Interfaces are build with [http://pythonqt.sourceforge.net/ PythonQt] which exposes most of the [http://qt.nokia.com Qt] interface so that sophisticated interfaces can be easily created. | Interfaces are build with [http://pythonqt.sourceforge.net/ PythonQt] which exposes most of the [http://qt.nokia.com Qt] interface so that sophisticated interfaces can be easily created. | ||
| Line 51: | Line 52: | ||
return tree | return tree | ||
</pre> | </pre> | ||
| + | |||
| + | === VTK and MRML === | ||
It is possible to implement the logic of the effect using [http://www.vtk.org/Wiki/VTK/Python_Wrapping_FAQ VTK Python binding]. You can get ideas of what is possible from [http://www.itk.org/Wiki/VTK/Tutorials the VTK tutorials]. | It is possible to implement the logic of the effect using [http://www.vtk.org/Wiki/VTK/Python_Wrapping_FAQ VTK Python binding]. You can get ideas of what is possible from [http://www.itk.org/Wiki/VTK/Tutorials the VTK tutorials]. | ||
| + | |||
Because MRML and most of the slicer functionality is written as VTK subclasses, they are available in python via the same mechanism. | Because MRML and most of the slicer functionality is written as VTK subclasses, they are available in python via the same mechanism. | ||
| Line 138: | Line 142: | ||
</pre> | </pre> | ||
| + | === Numpy === | ||
Slicer also comes bundled with [http://numpy.scipy.org/ numpy] so many interesting array operations are easy to perform on image data. | Slicer also comes bundled with [http://numpy.scipy.org/ numpy] so many interesting array operations are easy to perform on image data. | ||
| + | |||
| + | Here's an excerpt from [https://github.com/pieper/WandEffect/blob/master/WandEffect.py a working example]: | ||
| + | <pre> | ||
| + | # | ||
| + | # Get the numpy array for the bg and label | ||
| + | # | ||
| + | import vtk.util.numpy_support | ||
| + | backgroundImage = backgroundNode.GetImageData() | ||
| + | labelImage = labelNode.GetImageData() | ||
| + | shape = list(backgroundImage.GetDimensions()) | ||
| + | shape.reverse() | ||
| + | backgroundArray = vtk.util.numpy_support.vtk_to_numpy(backgroundImage.GetPointData().GetScalars()).reshape(shape) | ||
| + | labelArray = vtk.util.numpy_support.vtk_to_numpy(labelImage.GetPointData().GetScalars()).reshape(shape) | ||
| + | </pre> | ||
| + | |||
It is also possible to invoke slicer command line modules from python. These can be written in any language, but often rely on [http://www.itk.org ITK] for processing. In the near future [https://github.com/SimpleITK/SimpleITK#readme SimpleITK] should be available directly inside slicer. | It is also possible to invoke slicer command line modules from python. These can be written in any language, but often rely on [http://www.itk.org ITK] for processing. In the near future [https://github.com/SimpleITK/SimpleITK#readme SimpleITK] should be available directly inside slicer. | ||
Revision as of 22:57, 7 January 2012
Home < AHM2012-Slicer-PythonContents
What is accessible via python
Qt
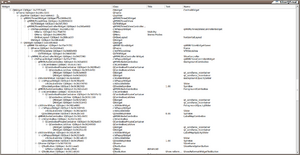
Interfaces are build with PythonQt which exposes most of the Qt interface so that sophisticated interfaces can be easily created.
import slicer

def widgetTree(root=""):
  if not root:
    root = slicer.util.mainWindow()
  global treeItems
  tree = qt.QTreeWidget()
  tree.setHeaderLabels(["Widget", "Class", "Title", "Text", "Name"])
  treeItems = {}
  treeItems[root] = qt.QTreeWidgetItem(tree)
  parents = [root]
  while parents != []:
    widget = parents.pop()
    if not widget:
      break
    widgetItem = qt.QTreeWidgetItem(treeItems[widget])
    children = widget.children()
    for child in children:
      treeItems[child] = widgetItem
    parents += children
    widgetItem.setText(0, str(widget))
    try:
      widgetItem.setText(1, widget.className())
    except AttributeError:
      pass
    try:
      widgetItem.setText(2, widget.title)
    except AttributeError:
      pass
    try:
      widgetItem.setText(3, widget.text)
    except AttributeError:
      pass
    try:
      widgetItem.setText(4, widget.name)
    except AttributeError:
      pass
  tree.setGeometry(100, 100, 1000, 500)
  tree.setColumnWidth(0,200)
  tree.setColumnWidth(0,300)
  tree.expandAll()
  tree.show()
  return tree
VTK and MRML
It is possible to implement the logic of the effect using VTK Python binding. You can get ideas of what is possible from the VTK tutorials.
Because MRML and most of the slicer functionality is written as VTK subclasses, they are available in python via the same mechanism.
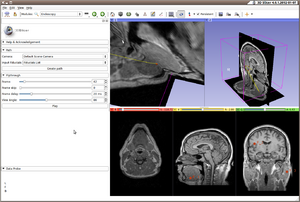
class EndoscopyPathModel:
  """Create a vtkPolyData for a polyline:
       - Add one point per path point.
       - Add a single polyline
  """
  def __init__(self, path, fiducialListNode):

    fids = fiducialListNode
    scene = slicer.mrmlScene

    points = vtk.vtkPoints()
    polyData = vtk.vtkPolyData()
    polyData.SetPoints(points)

    lines = vtk.vtkCellArray()
    polyData.SetLines(lines)
    linesIDArray = lines.GetData()
    linesIDArray.Reset()
    linesIDArray.InsertNextTuple1(0)

    polygons = vtk.vtkCellArray()
    polyData.SetPolys( polygons )
    idArray = polygons.GetData()
    idArray.Reset()
    idArray.InsertNextTuple1(0)

    for point in path:
      pointIndex = points.InsertNextPoint(*point)
      linesIDArray.InsertNextTuple1(pointIndex)
      linesIDArray.SetTuple1( 0, linesIDArray.GetNumberOfTuples() - 1 )
      lines.SetNumberOfCells(1)

    # Create model node
    model = slicer.vtkMRMLModelNode()
    model.SetScene(scene)
    model.SetName("Path-%s" % fids.GetName())
    model.SetAndObservePolyData(polyData)

    # Create display node
    modelDisplay = slicer.vtkMRMLModelDisplayNode()
    modelDisplay.SetColor(1,1,0) # yellow
    modelDisplay.SetScene(scene)
    scene.AddNodeNoNotify(modelDisplay)
    model.SetAndObserveDisplayNodeID(modelDisplay.GetID())

    # Add to scene
    modelDisplay.SetPolyData(model.GetPolyData())
    scene.AddNode(model)

    # Camera cursor
    sphere = vtk.vtkSphereSource()
    sphere.Update()

    # Create model node
    cursor = slicer.vtkMRMLModelNode()
    cursor.SetScene(scene)
    cursor.SetName("Cursor-%s" % fids.GetName())
    cursor.SetAndObservePolyData(sphere.GetOutput())

    # Create display node
    cursorModelDisplay = slicer.vtkMRMLModelDisplayNode()
    cursorModelDisplay.SetColor(1,0,0) # red
    cursorModelDisplay.SetScene(scene)
    scene.AddNodeNoNotify(cursorModelDisplay)
    cursor.SetAndObserveDisplayNodeID(cursorModelDisplay.GetID())

    # Add to scene
    cursorModelDisplay.SetPolyData(sphere.GetOutput())
    scene.AddNode(cursor)

    # Create transform node
    transform = slicer.vtkMRMLLinearTransformNode()
    transform.SetName('Transform-%s' % fids.GetName())
    scene.AddNode(transform)
    cursor.SetAndObserveTransformNodeID(transform.GetID())

    self.transform = transform
Numpy
Slicer also comes bundled with numpy so many interesting array operations are easy to perform on image data.
Here's an excerpt from a working example:
    #
    # Get the numpy array for the bg and label
    #
    import vtk.util.numpy_support
    backgroundImage = backgroundNode.GetImageData()
    labelImage = labelNode.GetImageData()
    shape = list(backgroundImage.GetDimensions())
    shape.reverse()
    backgroundArray = vtk.util.numpy_support.vtk_to_numpy(backgroundImage.GetPointData().GetScalars()).reshape(shape)
    labelArray = vtk.util.numpy_support.vtk_to_numpy(labelImage.GetPointData().GetScalars()).reshape(shape)
It is also possible to invoke slicer command line modules from python. These can be written in any language, but often rely on ITK for processing. In the near future SimpleITK should be available directly inside slicer.
See the Slicer4 Python page for examples.
Using the console
(See J2's excellent demo video)
Writing a Scripted Module
- PythonQt interface
- Logic with vtk/vtkITK/CLI Modules
- Accessing MRML Data via numpy

