Difference between revisions of "Projects:ARRA:SlicerWF:UseCaseScenarios"
| (5 intermediate revisions by 2 users not shown) | |||
| Line 10: | Line 10: | ||
** Data loaded into Slicer for interactive editing of label maps as QC | ** Data loaded into Slicer for interactive editing of label maps as QC | ||
** Results loaded back into XNAT | ** Results loaded back into XNAT | ||
| − | + | =Use-case MS lesion Assessment= | |
| + | # Workflow "blackbox" generates lesion maps along with lesion coordinates files | ||
| + | # Human Interaction module loads image volumes into Slicer with fiduciary markers for lesion assessment | ||
| + | # Detailed Scenario is described below | ||
| + | |||
| + | '''Step 1 ''' Download Images from Xnat | ||
| + | Convert T1, T2 images into Slicer3 format | ||
| + | |||
| + | '''Step 2 ''' (preprocessing): | ||
| + | Register T2 to T1 | ||
| + | |||
| + | '''Step 3''' (preprocessing) | ||
| + | |||
| + | Skull Stripping of T1 and T2_registered images | ||
| + | |||
| + | Step 3A . Generation of Brainmask/ICC | ||
| + | |||
| + | Step 3B. Manual Editing if Brainmask/ICC | ||
| + | |||
| + | Step 3C. Skull Stripping per se | ||
| + | |||
| + | '''Step 4 '''(preprocessing) Optional | ||
| + | Intensity Normalization to the "gold standard" image(s) in case of automated runs | ||
| + | |||
| + | '''Step 5''' Generate EM Segmentation Scene from the template. | ||
| + | |||
| + | '''Step 6''' Load The scene into Slicer3 | ||
| + | |||
| + | '''Step 7''' Adjust input parameters if needed. | ||
| + | Train or re-train data for intensity distribution | ||
| + | |||
| + | '''Step 8''' Run EM Segmenter | ||
| + | |||
| + | '''Step 9''' Repeat Steps 7 and 8 if needed | ||
| + | |||
| + | '''Step 10''' Save EM Segmented Label Map Volume with Feducials' coordinates | ||
| + | |||
| + | '''Step 11''' Visual Lesion Assessment | ||
| − | + | '''Step 12''' Upload Results to XNat | |
| − | |||
| − | |||
| − | |||
| − | |||
=Use-case COPD= | =Use-case COPD= | ||
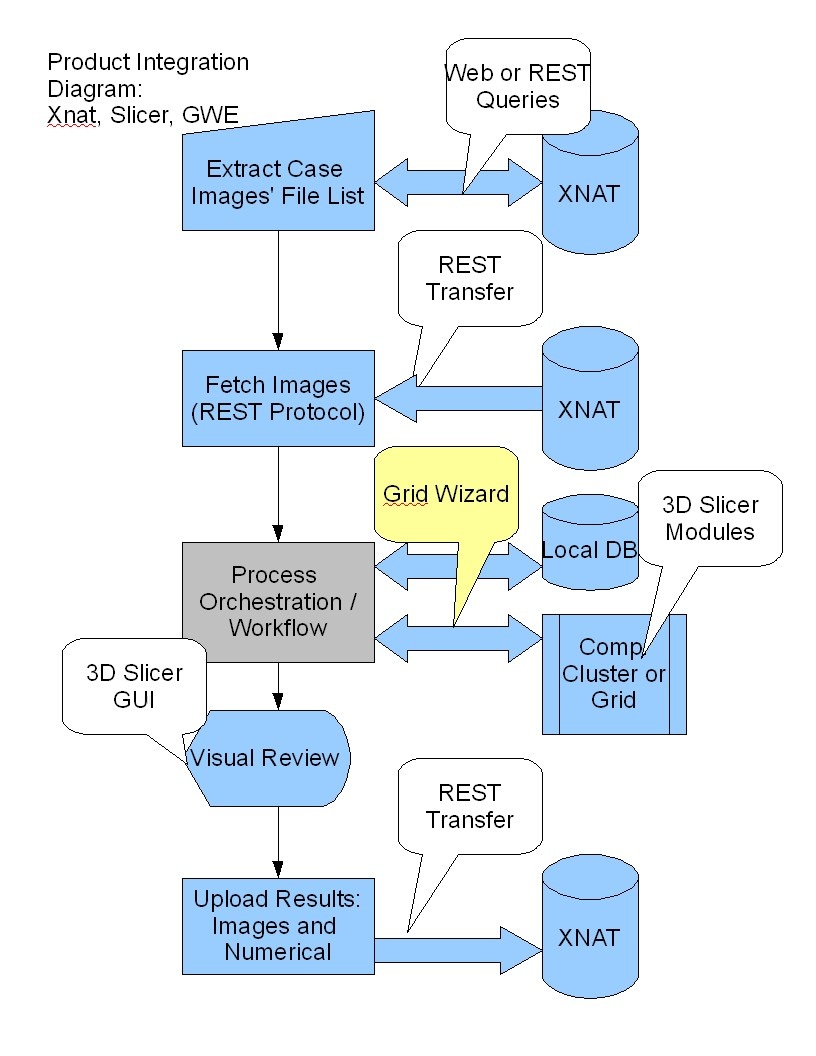
| + | [[File:WF_IntegrationDiagram_General.jpg]] | ||
| + | |||
| + | =External use-cases= | ||
| + | * see also [[2009_Summer_Project_Week_Slicer3_XNAT_usecases#Use_Case_3:_Quality_Control_Processing_of_Large_Studies| Hans Johnsons scenario]] for similarities. | ||
Latest revision as of 22:27, 11 December 2009
Home < Projects:ARRA:SlicerWF:UseCaseScenariosBack to SPINE ARRA page
Overview
- Oct-20-2009
- Meeting with Charles and Alex. Discussed following use-case scenario:
- Data lives in XNAT
- Black box processing pipeline applied to data
- Results back to XNAT after QC for completeness
- MRML file gets autogenerated
- Data loaded into Slicer for interactive editing of label maps as QC
- Results loaded back into XNAT
Use-case MS lesion Assessment
- Workflow "blackbox" generates lesion maps along with lesion coordinates files
- Human Interaction module loads image volumes into Slicer with fiduciary markers for lesion assessment
- Detailed Scenario is described below
Step 1 Download Images from Xnat Convert T1, T2 images into Slicer3 format
Step 2 (preprocessing): Register T2 to T1
Step 3 (preprocessing)
Skull Stripping of T1 and T2_registered images
Step 3A . Generation of Brainmask/ICC
Step 3B. Manual Editing if Brainmask/ICC
Step 3C. Skull Stripping per se
Step 4 (preprocessing) Optional Intensity Normalization to the "gold standard" image(s) in case of automated runs
Step 5 Generate EM Segmentation Scene from the template.
Step 6 Load The scene into Slicer3
Step 7 Adjust input parameters if needed. Train or re-train data for intensity distribution
Step 8 Run EM Segmenter
Step 9 Repeat Steps 7 and 8 if needed
Step 10 Save EM Segmented Label Map Volume with Feducials' coordinates
Step 11 Visual Lesion Assessment
Step 12 Upload Results to XNat
Use-case COPD
External use-cases
- see also Hans Johnsons scenario for similarities.
