Difference between revisions of "Slicer Training Volume Rendering"
| Line 32: | Line 32: | ||
=== Advanced Options and the Transfer Function === | === Advanced Options and the Transfer Function === | ||
| − | The advanced tab lets more experienced doctors do the fine tuning on the ''' | + | The advanced tab lets more experienced doctors do the fine tuning on the '''Transfer Functions'''. |
[[Image:Slicer3_VolRen_Advanced.png|thumb|right|Volume Rendering - Advanced]] | [[Image:Slicer3_VolRen_Advanced.png|thumb|right|Volume Rendering - Advanced]] | ||
| − | '''Transfer | + | '''Transfer Functions''' are the basic building block of volume rendering. |
| − | They | + | They define the final rendering color for each voxel in the 3D grey scale data. |
| + | This can be used to give all tissue with the density of bone a solid white color and paint the skin tissue in a translucent pink above it. | ||
== Transfer Functions == | == Transfer Functions == | ||
Revision as of 17:36, 27 March 2008
Home < Slicer Training Volume RenderingContents
Volume Rendering
Get It Running
- To get volume rendering to work within 3D Slicer we have to make sure that a MRML node with Volumetric Data exists.
- If not a new set of volume data must be loaded. For this demo we will load the tutorial data found here.
- Download and Uncompress this folder
- In 3D Slicer go to File -> Load Scene
- Select the tutorial.xml
- Now select the VolumeRendering Module.
- Select a valid volume as the Source Volume
The Volume Rendering will be initialized. Have patience....
Parameters
Performance Triggers
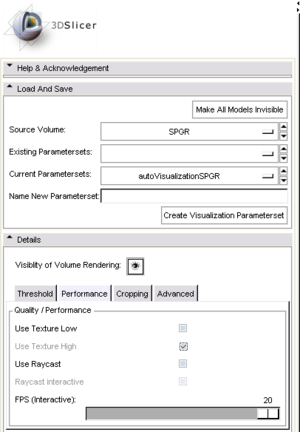
You can adjust the performance of volume rendering by enabling and disabling quality improvements. The Volume Rendering Module has three performance levels
- Low Resolution Hardware Rendering (worst - fastest)
- Full Resolution Hardware Rendering
- Software Rendering (best - slowest)
When all of them are selected slicer uses the low resolution when the camera is moving or nodes in the scene are changing and when nothing is changing anymore the high resolution volume is performed.
The FPS tag lets slicer decide what resolution should be used to produce an interactive experience.
Cropping
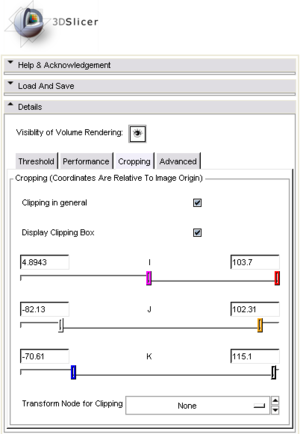
With cropping the volume can be limited to a certain area. This is useful if a surgeon only wants to see a certain part of the volume or cut at an exact plane.
This feature also comes with a integrated 3 dimensional widget to adjust the handlers on the visualization screen.
Try it out!
Advanced Options and the Transfer Function
The advanced tab lets more experienced doctors do the fine tuning on the Transfer Functions.
Transfer Functions are the basic building block of volume rendering. They define the final rendering color for each voxel in the 3D grey scale data. This can be used to give all tissue with the density of bone a solid white color and paint the skin tissue in a translucent pink above it.


