|
|
| Line 45: |
Line 45: |
| | | | |
| | == ARCTIC Download == | | == ARCTIC Download == |
| − | === Source code available with CVS ===
| |
| | | | |
| − | ====Required softwares==== | + | === CVS access, Executables and tutorial dataset === |
| − | | |
| − | * Install required softwares to compile the NeuroLib
| |
| − | - [http://www.cmake.org/cmake/resources/software.html| CMake]
| |
| − | | |
| − | - [http://www.batchmake.org/batchmake/resources/software.html| BatchMake] (v 1.0.8 needed, use cvs access)
| |
| − | | |
| − | - [http://www.fltk.org/software.php| FLTK]
| |
| − | | |
| − | - [http://www.slicer.org/DownloadSlicer.php/Nightly| Slicer Nighly Build]
| |
| − | | |
| − | | |
| − | ====Download and install the NeuroLib====
| |
| − | | |
| − | * Create and go to a NeuroLib/ directory
| |
| − | mkdir NeuroLib
| |
| − | cd NeuroLib
| |
| − | * Make the following commands :
| |
| − | cvs -d :pserver:anonymous@demeter.ia.unc.edu:/cvsroot login (press Enter for password)
| |
| − | cvs -d :pserver:anonymous@demeter.ia.unc.edu:/cvsroot co -P NeuroLib
| |
| − | * Create and go to a Neurolib-build/ directory
| |
| − | mkdir NeuroLib-build
| |
| − | cd NeuroLib-build
| |
| − | * Start the compilation while launching 'ccmake'
| |
| − | ccmake ../NeuroLib
| |
| − | *Configure the compilation
| |
| − | Set ARCTIC at "ON"
| |
| − | Press 'c' to start the configuration
| |
| − | | |
| − | === Executables and tutorial dataset ===
| |
| | Available on NITRC : http://www.nitrc.org/projects/arctic/ | | Available on NITRC : http://www.nitrc.org/projects/arctic/ |
| | | | |
| Line 98: |
Line 68: |
| | </center> | | </center> |
| | | | |
| − | == ARCTIC (Automatic Regional Cortical ThICkness) usage: ==
| |
| − |
| |
| − |
| |
| − | === Prerequities ===
| |
| − |
| |
| − | Add directories to the PATH variable
| |
| − | -tcsh usage : setenv PATH ARCTIC-Executables-Directory:Slicer3-Plugins-Directory:Slicer3-Bin-Directory:${PATH}
| |
| − | -bash usage : export PATH=ARCTIC-Executables-Directory:Slicer3-Plugins-Directory:Slicer3-Bin-Directory:${PATH}
| |
| − | Notice : To execute ARCTIC within Slicer3D, it is not necessary to add "Slicer3D-Bin-Directory" and "Slicer3-Bin-Directory" in the PATH.
| |
| − |
| |
| − | Add libraries to the LD_LIBRARY_PATH variable
| |
| − | -tcsh usage : setenv SLICERLIBPATH Slicer-nightly-build/lib
| |
| − | setenv LD_LIBRARY_PATH ${LD_LIBRARY_PATH}:${SLICERLIBPATH}/BatchMake:${SLICERLIBPATH}/bmModuleDescriptionParser:${SLICERLIBPATH}/FreeSurfer:${SLICERLIBPATH}/GenerateCLP:${SLICERLIBPATH}/GenerateLM:${SLICERLIBPATH}/IGT:${SLICERLIBPATH}/igtl:${SLICERLIBPATH}/InsightToolkit:${SLICERLIBPATH}/ITKCommandIO:${SLICERLIBPATH}/KWWidgets:${SLICERLIBPATH}/LoadableModule:${SLICERLIBPATH}/MGHImageIO:${SLICERLIBPATH}/ModuleDescriptionParser:${SLICERLIBPATH}/MRML:${SLICERLIBPATH}/MRMLIDImageIO:${SLICERLIBPATH}/OpenIGTLink:${SLICERLIBPATH}/Python/lib:${SLICERLIBPATH}/Qdec:${SLICERLIBPATH}/RemoteIO:${SLICERLIBPATH}/Slicer3:${SLICERLIBPATH}/SlicerIO:${SLICERLIBPATH}/tclap:${SLICERLIBPATH}/TclTk/lib:${SLICERLIBPATH}/Teem-1.10.0:${SLICERLIBPATH}/vtk-5.2:${SLICERLIBPATH}/vtkITK:${SLICERLIBPATH}/vtkTeem
| |
| − | -bash usage : export SLICERLIBPATH=Slicer-nightly-build/lib
| |
| − | export LD_LIBRARY_PATH=${LD_LIBRARY_PATH}:${SLICERLIBPATH}/BatchMake:${SLICERLIBPATH}/bmModuleDescriptionParser:${SLICERLIBPATH}/FreeSurfer:${SLICERLIBPATH}/GenerateCLP:${SLICERLIBPATH}/GenerateLM:${SLICERLIBPATH}/IGT:${SLICERLIBPATH}/igtl:${SLICERLIBPATH}/InsightToolkit:${SLICERLIBPATH}/ITKCommandIO:${SLICERLIBPATH}/KWWidgets:${SLICERLIBPATH}/LoadableModule:${SLICERLIBPATH}/MGHImageIO:${SLICERLIBPATH}/ModuleDescriptionParser:${SLICERLIBPATH}/MRML:${SLICERLIBPATH}/MRMLIDImageIO:${SLICERLIBPATH}/OpenIGTLink:${SLICERLIBPATH}/Python/lib:${SLICERLIBPATH}/Qdec:${SLICERLIBPATH}/RemoteIO:${SLICERLIBPATH}/Slicer3:${SLICERLIBPATH}/SlicerIO:${SLICERLIBPATH}/tclap:${SLICERLIBPATH}/TclTk/lib:${SLICERLIBPATH}/Teem-1.10.0:${SLICERLIBPATH}/vtk-5.2:${SLICERLIBPATH}/vtkITK:${SLICERLIBPATH}/vtkTeem
| |
| − |
| |
| − | Set an environment variable
| |
| − | -tcsh usage : setenv BatchmakeWrapper_Dir Batchmake-Wrapper-Directory
| |
| − | -bash usage : export BatchmakeWrapper_Dir=Batchmake-Wrapper-Directory
| |
| − |
| |
| − | Set ARCTIC as a Slicer3D module
| |
| − | Within Slicer3D : View -> Applications Settings -> Module Settings -> Add a preset button and then select the ARCTIC-Executables-Directory/
| |
| − |
| |
| − | === Command line execution ===
| |
| − |
| |
| − | ARCTIC can be use with two different input modes.
| |
| − |
| |
| − | ==== Raw Image Mode ====
| |
| − |
| |
| − | Inputs: T1-weighted image, T1-weighted atlas, regional atlas (parcellation map)
| |
| − |
| |
| − | ARCTIC --T1 Image_T1.gipl --segAtlasDir TissueSegmentationAtlasDirectory/ --atlas Atlas.gipl --atlasParcellation Parcellation.gipl
| |
| − |
| |
| − | Complementary flags
| |
| − | --T2 Image_T2.gipl / --pd Image_PD.gipl : T2 and/or Pd-weighted image(s) can be added to improve tissue segmentation
| |
| − | --orientation RAI : if the orientation of your file(s) is different than the default value (RAI), add this flag to set the right orientation
| |
| − | --atlasOrientation : if the orientation of your tissue segmentation atlas is different than the default value (RAI), add this flag to set the right orientation
| |
| − | --atlasType T1 : if the type of your tissue segmentation atlas is different than T1 (default value)
| |
| − | --outputDir output_directory/ : if you want to select the output directory, add this flag and indicate the path an existing folder
| |
| − | --SaveWM WMCorticalThicknessMap.gipl / --SaveGM GMCorticalThicknessMap.gipl : those flags are used to save a volume with information of the average cortical thickness on WM/GM boundary(ies), the fileName needed is a path with the name of the output volume
| |
| − |
| |
| − | ==== Segmented Image Mode ====
| |
| − |
| |
| − | Inputs: label image, regional atlas (parcellation map)
| |
| − |
| |
| − | ARCTIC --label label_image.gipl --rawImage raw_image.gipl --atlas Atlas.gipl --atlasParcellation Parcellation.gipl
| |
| − | Notice : the "raw_image.gipl" file is a MRI image of the case. It can be a T1-weighted image as well as a T2 or a PD.
| |
| − |
| |
| − | Complementary flags
| |
| − | --WMLabel 1 / --GMLabel 2 / --CSFLabel 3 : if tour label are different than the default value
| |
| − | --outputDir output_directory/ : if you want to select the output directory, add this flag and indicate the path an existing folder
| |
| − | --SaveWM WMCorticalThicknessMap.gipl / --SaveGM GMCorticalThicknessMap.gipl : those flags are used to save a volume with information of the average cortical thickness on WM/GM boundary(ies), the fileName needed is a path with the name of the output volume
| |
| − |
| |
| − | === Step by step command line execution ===
| |
| − |
| |
| − | :* '''1. Tissue segmentation'''
| |
| − | :**Input: EMSparam.xml
| |
| − | :**Output: Image_Corrected_EMS.gipl, Label.gipl
| |
| − | itkEMSCLP --XMLFile EMSparam.xml
| |
| − | :* '''2. Skull stripping'''
| |
| − | :**Input: Label.gipl, Image_Corrected_EMS.gipl
| |
| − | :**Output: Image_Corrected_EMS_Stripped.gipl, BinaryMask.gipl (optional)
| |
| − | SegPostProcessCLP Label.gipl Image_Corrected_EMS_Stripped.gipl --skullstripping Image_Corrected_EMS.gipl
| |
| − | :* '''3. Deformable registration of pediatric regional atlas'''
| |
| − | :**3.1 Deformable registration of T1-weighted pediatric atlas
| |
| − | :***Input: Atlas.gipl, Image_Corrected_EMS_Stripped.gipl
| |
| − | :***Output: Atlas_Registered.gipl, Atlas_Registered_Transform.txt
| |
| − | RegisterImages Image_Corrected_EMS_Stripped.gipl Atlas.gipl –resampledImage Atlas_Registered.gipl –saveTransform Atlas_Registered_Transform.txt –registration PipelineBSpline
| |
| − | :**3.2. Applying transformation to the parcellation map
| |
| − | :***Input: Parcellation.gipl, Atlas_Registered_Transform.txt, Image_Corrected_EMS_Stripped.gipl
| |
| − | :***Output: Parcellation_Registered.gipl
| |
| − | ResampleVolume2 Parcellation.gipl Parcellation_Registered.gipl -f Atlas_Registered_Transform.txt -i nn -R Image_Corrected_EMS_Stripped.gipl
| |
| − | :* '''4. Cortical Thickness'''
| |
| − | :**Input: Parcellation_Registered.gipl, Label.gipl
| |
| − | :**Output: CortThick_Result_Dir/, WMCorticalThicknessMap, GMCorticalThicknessMap
| |
| − | CortThickCLP CortThick_Result_Dir/ --par Parcellation_Registered.gipl --inputSeg Label.gipl --SaveWM WMCorticalThicknessMap --SaveGM GMCorticalThicknessMap
| |
| | | | |
| | == Pipeline validation == | | == Pipeline validation == |
Back to UNC Cortical Thickness Roadmap
Objective
We would like to create an end-to-end application within Slicer3 allowing individual and group analysis of regional cortical thickness.
This page describes the related pipeline with its basic components, as well as its validation.
Pipeline overview
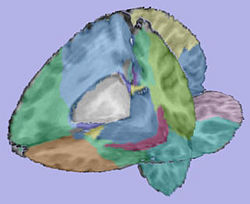
A Slicer3 high-level module for individual cortical thickness analysis has been developed: ARCTIC (Automatic Regional Cortical ThICkness)
Input: RAW images (T1-weighted, T2-weighted, PD-weighted images)
- 1. Tissue segmentation
- Probabilistic atlas-based automatic tissue segmentation via an Expectation-Maximization scheme
- Tool: itkEMS (UNC Slicer3 external module)
- 2. Regional atlas deformable registration
- 2.1 Skull stripping using previously computed tissue segmentation label image
- Tool: SegPostProcess (UNC Slicer3 external module)
- 2.2 T1-weighted atlas deformable registration
- B-spline pipeline registration
- Tool: RegisterImages (Slicer3 module)
- 2.3. Applying transformation to the parcellation map
- Tool: ResampleVolume2 (Slicer3 module)
- 3. Cortical Thickness
- Sparse asymmetric local cortical thickness
- Tool: CortThick (UNC Slicer3 external module)
- 4. Statistics
- Generate spreesheats with volume informations
- Tools: ImageMath, ImageStat (UNC Slicer3 external modules)
- 5. Mesh Creation
- Generation of white matter and grey matter meshes
- Tool: ModelMaker (Slicer3 module)
- 6. MRML scene creation
- Creation of a MRML scene describing all the steps of the pipeline
All the tools used in the current pipeline are Slicer3 modules, some of them being UNC external modules.
The user can thus compute an individual regional cortical thickness analysis by running the 'ARCTIC' module, either within Slicer3 or as a command line.
ARCTIC Download
CVS access, Executables and tutorial dataset
Available on NITRC : http://www.nitrc.org/projects/arctic/
Complementary Downloads
Pediatric atlas
Available on MIDAS : http://www.insight-journal.org/midas/item/view/2277
Tutorials
• ARCTIC tutorial : end-to-end Slicer3 module to perform automatic regional cortical thickness analysis [ppt] [pdf]
• UNC Modules tutorial : UNC Slicer3 modules to perform regional cortical thickness analysis step by step [ppt] [pdf]
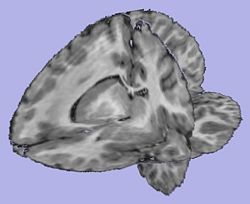 T1-weighted skull-stripped image |
|
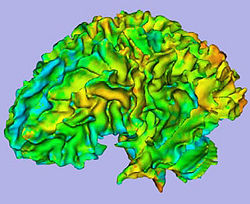 Cortical thickness on WM surface |
 Cortical thickness information |
Pipeline validation
Analysis on a small pediatric dataset
Tests have been computed on a small pediatric dataset which includes 2 year-old and 4 year-old cases.
- 16 autistic cases
- 1 developmental delay
- 3 normal control
Comparison to state of the art
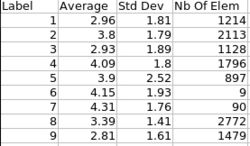
We would like to compare our pipeline with FreeSurfer. We have thus started to perform a regional statistical analysis using Pearson's correlation coefficient on a pediatric dataset including 90 cases.
Two distinct groups are considered: 2 year-old cases and 4 year-old cases.
Planning
Done
- Workflow for individual analysis (Slicer3 external module using BatchMake)
- 2 Tutorials with application example on a small dataset : "How to use the UNC modules to compute the regional cortical thickness" and "How to use ARCTIC"
- Pediatric atlases available to the community through MIDAS
- ARCTIC available to the community through NITRC: executables (UNC external modules for Slicer3) and Tutorial dataset
- New version including quality control through MRML scene, and WM, GM models generation
- ARCTIC source code (SVN, CVS) available to the community
In progress
- Comparison to FreeSurfer (180 cases dataset): pearson correlation analysis
- Mac and windows executables available on to the community through NITRC
