Difference between revisions of "CTSC DataManagementWorkflow"
| Line 47: | Line 47: | ||
anonymizing is performed during this step as well. | anonymizing is performed during this step as well. | ||
| − | * Case 2 - Upload of segmentations derived from DICOM data. This | + | * Case 2 - Upload of segmentations derived from DICOM data. This can be even more problematic, depending on the situation. I am currently |
uploading prostate segmentations combined with the original DICOM data. Each subject has several MRI series and an expert labelmap | uploading prostate segmentations combined with the original DICOM data. Each subject has several MRI series and an expert labelmap | ||
segmentation that need to be uploaded as a single subject. The researcher's approach was to create a new series number for the segmentation, | segmentation that need to be uploaded as a single subject. The researcher's approach was to create a new series number for the segmentation, | ||
| Line 60: | Line 60: | ||
Here is the segmented data in xnat: | Here is the segmented data in xnat: | ||
| − | [[File:seg.png]] [ Labelled colon segmentation] | + | [[File:seg.png]] [ Labelled colon segmentation on xnat central] |
Obviously,we will need a more elegant solution to upload data derived in this fashion in the future. | Obviously,we will need a more elegant solution to upload data derived in this fashion in the future. | ||
Revision as of 21:02, 10 November 2009
Home < CTSC DataManagementWorkflow<< back to CTSC Imaging Informatics Initiatiave
Contents
- 1 Target Data Management Process Option A. interactive upload using various tools and web gui (Mark Anderson) CURRENTLY BEING DEVELOPED
- 2 Notes on derived data upload and FMRI data upload.
- 3 Target Data Management Process Option B. batch scripted upload via DICOM Server (Yong Gao) CURRENTLY BEING DEVELOPED
- 4 Target Data Management Process Option C. batch scripted upload via web services (Wendy Plesniak) CURRENTLY BEING DEVELOPED
Target Data Management Process Option A. interactive upload using various tools and web gui (Mark Anderson) CURRENTLY BEING DEVELOPED
- Create Project in web GUI with ProjectID IGT_GLIOMA and create the custom variables that additionally describe the data.In this project, we
added variables for tumor size, location, description and grade and patient sex and age.
- The value of these variables is manually entered
and displayed when a subject is selected. Custom variables cannot currently be used as search criteria to select a subset of the project.
- Get User session id with:
XNATRestClient -host $XNE_Svr -u manderson -p my-passwd -m POST -remote /REST/JSESSION
- Use session ID to create all subjects, e.g.
XNATRestClient -host $XNE_Svr -user_session 94202E5B23C1672FDF1B2D1A40173F21 -m PUT -dest /REST/ projects/IGT_GLIOMA/subjects/case3
This can be automated for lots of subjects.
- Anonymize all patient data. I tried the DicomRemapper:
DicomBrowser-1.5-SNAPSHOT/bin/DicomRemap /projects/igtcases/neuro/glioma_mrt/for_hussein/1802 -o /d/bigdaily/
but this fails if non-dicom files are found amongst the DICOM data:
/projects/igtcases/neuro/glioma_mrt/for_hussein/1802/tumor.xml: not DICOM data
this will often be the case for us at BWH so this to is not currently viable. I used the interactive DicomBrowser tool. This requires editing a DICOM descriptor .das file for each subject, and 20 mouse-clicks to specify parameters and do the anonymizing.
- Upload the anonymized data. This requires making a compressed tar file of the anonymized data and running the upload process from
xnat Central
- The entire process of manually uploading and anonymizing a case takes between six and ten minutes.
- Several types of errors were encountered:
- Data entry at scan time. Subject age for one subject listed as 100years old, subject born in 1984
- Spreadsheet errors. All subject ages were incorrect. I used the age at date of scan. One subject listed as a 20 year-old male, but data is for a 34-year old female
- It is certainly possible that I made errors transcribing values from the spreadsheet.
Notes on derived data upload and FMRI data upload.
- Case 1 - Older non-dicom genesis data upload. This is done using Dave Clunie's useful dicom3tools kit. Genesis data gets converted to DICOM
with from a directory containing only pre-dicom, genesis format images(named I.001 - I.xxx) with the command:
ls -1 I.* | awk '{printf("gentodc %s %d.dcm\n",$1,NR)}' | sh
This will create a series of dicom images, However, gentodc creates a unique SeriesInstanceUID for each image:
(0020,000e) UI [0.0.0.0.3.1779.1.1257878261.15832.2200373056] #  44, 1 SeriesInstanceUID
(0020,000e) UI [0.0.0.0.3.1779.1.1257878261.15833.2200373056] #  44, 1 SeriesInstanceUID
(0020,000e) UI [0.0.0.0.3.1779.1.1257878261.15834.2200373056] #  44, 1 SeriesInstanceUID
(0020,000e) UI [0.0.0.0.3.1779.1.1257878261.15835.2200373056] #  44, 1 SeriesInstanceUID
When the resulting data is uploaded to xnat, each image is treated as a series. I uploaded 300 images (all part of a single study) before I realized this problem. This fills the prearchive and takes a long time to clean up. As a solution, a second step is run to modify the dicom images. This is done by applying the xnat remapper to the newly formed dicom data:
/projects/mark/xnat/DicomBrowser-1.5-SNAPSHOT/bin/DicomRemap -d ../tmp/sp.das -o /d/bigdaily/mark/tmp/ .
Where file sp.das contains:
(0020,000e) := "0.0.0.0.3.1779.1.1257878261.15832.2200373056"
which sets all images to the same SeriesInstanceUID - This remapping needs to be performed on a series-by-series basis currently. Other anonymizing is performed during this step as well.
- Case 2 - Upload of segmentations derived from DICOM data. This can be even more problematic, depending on the situation. I am currently
uploading prostate segmentations combined with the original DICOM data. Each subject has several MRI series and an expert labelmap segmentation that need to be uploaded as a single subject. The researcher's approach was to create a new series number for the segmentation, using the series header information from the original data. When this is uploaded, the segmentation is treated as duplicate data by xnat. Xnat thinks the data already exists, based on the header information. The solution here is potentially more complicated. Not only does a new SeriesInstanceUID need to be created, but also it appears that xnat verifies that the SOPInstanceUID i.e. the unique image identifier is in fact unique. Apparently, xnat only checks the first image of a series to check that the SOPInstanceUID is in fact unique as I was able to apply the remapper to a series of data with a single .das file that set the same SOPInstanceUID to every image in the series. Below are the SOPInstanceUID and SeriesInstanceUID that were applied to the segmented data:
(0008,0018) := "1.2.840.113619.2.207.3596.11861984.22869.1219405353.999"
(0020,000e) := "1.2.840.113619.2.207.3596.11861984.25740.1219404288.477"
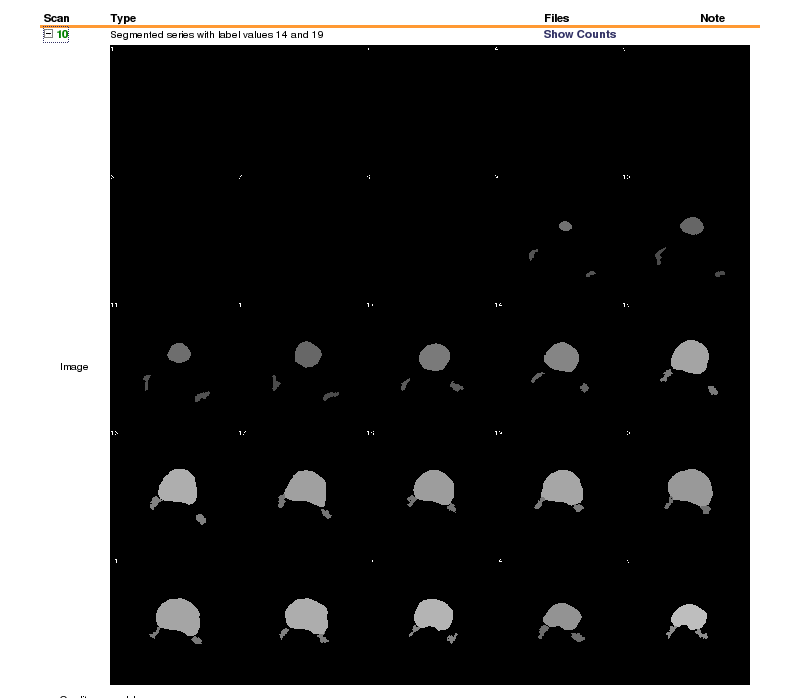
Here is the segmented data in xnat:
 [ Labelled colon segmentation on xnat central]
Obviously,we will need a more elegant solution to upload data derived in this fashion in the future.
- Case3 - FMRI data upload - Below is the essense of an email that I sent to the xnat discussion group that I never
heard back from:
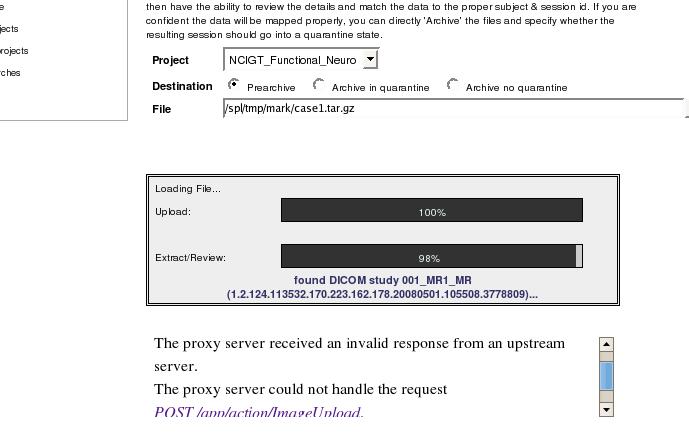
I am uploading some large FMRI datasets to xnat central. Each exam has about 10k images. I have been anonymizing the data with DicomRemap and modifying the series descriptions to describe the fmri task being performed for each series via the .das file. During the upload process, I get a proxy error:
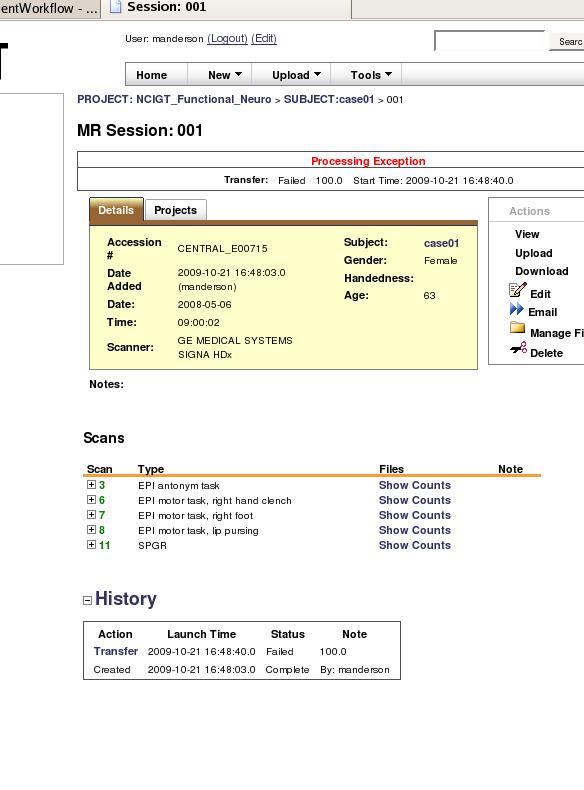
But sometime later my data shows up in the prearchive and appears complete and intact and I can move it to the project. However, when I then select the subject from the project, I see a processing exception at the top of the page:
I am concerned that when we go to share the data after uploading everything, if someone sees this processing exception they will figure the data is corrupt whereas it is complete and wont use it. So I am curious: 1) if there is a way to suppress this error after upload? 2) is it even feasible to upload such large datasets? the relative size 300M compressed in not large, but the image count is. 3) are there alternative better methods to upload?
I looked at http://nrg.wikispaces.com/XNAT+Data+Management
which describes an FTP upload process, but I dont see how to do this to XNAT central
I also looked into using http://nrg.wikispaces.com/StoreXAR and tried to organize my data and SESSION.xml file as describe here, but this generated a connection error:
Thu Oct 22 18:13:57 EDT 2009 manderson@http://central.xnat.org:8104/:java.net.ConnectException: Connection timed out
and likely I didnt specify the XML file correctly. Is there a way to generate the xml automatically by scanning the organized data? If not, it seems easier to just upload the compressed tar file, do something else for a while , and then move the data to the project from the prearchive, this is relatively non-time-consuming as xnat does the work and displays the series descriptions that I want, I dont need any custom variables.
Thanks for any help/pointers.
Target Data Management Process Option B. batch scripted upload via DICOM Server (Yong Gao) CURRENTLY BEING DEVELOPED
- Create new project using web GUI
- Manage project using web GUI: Configure settings to automatically place data into the archive (no pre-archive)
- Create a subject template (download from web GUI)
- Create a spreadsheet conforming to subject template
- Upload spreadsheet using web GUI to create subjects
Content for Batch anonymize & upload script(s)
- Run CLI Tool for batch anonymization (See here for HowTo: http://nrg.wustl.edu/projects/DICOM/DicomBrowser/batch-anon.html)
- Need pointer for script to do batch upload & apply DICOM metadata.
- Confirm data is uploaded & represented properly with web GUI
Target Data Management Process Option C. batch scripted upload via web services (Wendy Plesniak) CURRENTLY BEING DEVELOPED
1. Create new project on XNAT instance using web GUI
- Create a new project by selecting the New button at the GUI top
- Select the project from the project list.
- From within the Project view, Click "Access" tab and set permissions to be appropriate
- From within the Project view, Select the "Manage" tab and configure settings to automatically place data into the archive (no pre-archive)
Content for Batch anonymize & upload script(s)
2. Batch Anonymize your local data (STILL TESTING)
- The approach to writing anonymization scripts is here: http://nrg.wustl.edu/projects/DICOM/AnonScript.jsp
- See description for batch anonymization here: http://nrg.wustl.edu/projects/DICOM/DicomBrowser/batch-anon.html
- Download and install commandline tools: http://nrg.wustl.edu/projects/DICOM/DicomBrowser-cli.html
2.a Create a remapping config xml file to describe the spreadsheet to be built from the DICOM data. Root element is "Columns" and each subelement describes a column in the spreadsheet:
- tag = DICOM tag
- level = (global, patient, study, series) describes the level at which the remapping is applied
An example is:
<Columns>
 <Global remap="Fixed Institution Name">(0008,0080)</Global>
 <Global remap="Anon Requesting Physician" (0032,1032)</Global>
 <Patient remap="Anon Patient Name">(0010,0010)</Patient>
 <Patient remap="Anon PatientID">(0010,0020)</Patient>
 <Patient remap="Anon Patient Address" (0010,1040)</Patient>
 <Study>(0020,0010)</Study>
 <Study>(0008,0020)</Study>
 <Series>(0020,0011)</Series>
 <Series>(0008,0031)</Series>
</Columns>
2.b Generate a spreadsheed from the data that includes the remapped dicom tags:
DicomSummarize -c remap-config-file.xml -v remap.csv [directory-1 ...]
The arguments in brackets are a list of directories containing the source DICOM data (separated by spaces?)
2.c Write an anonymization script for any simple changes, such as deleting an attribute, or setting an attribute value to either a fixed value or a simple function of other attribute values in the same file. Here, make sure to remove patient address and requesting physician as noted, plus whatever else you'd like (recommendations?)
See http://nrg.wustl.edu/projects/DICOM/AnonScript.jsp for detailed information about writing anonymization scripts. Here's a script written by Mark during his testing.
// removes all attributes specified in the
//  DICOM Basic Application Level Confidentiality Profile
// mark@bwh.harvard.edu added the following tags:
// (0010,1040) PatientsAddress
// (0032,1032) RequestingPhysician
// is seems the study and series InstanceUID tags are needed  (0020,000D) (0020,000E)
//- (0020,000D)
//- (0020,000E)
// - (0010,1010) preserve pt age
// - (0010,1040) preserve pt sex
- (0008,0014)
- (0008,0050)
- (0008,0080)
- (0008,0081)
- (0008,0090)
- (0008,0092)
- (0008,0094)
- (0008,1010)
 (0008,1030) := "SPL_IGT"
- (0008,1040)
- (0008,1048)
- (0008,1050)
- (0008,1060)
- (0008,1070)
- (0008,1080)
- (0008,2111)
 (0010,0010) := "case143"
 (0010,0020) := "case143"
- (0010,0030)
- (0010,0032)
- (0010,1040)
- (0010,0040)
- (0010,1000)
- (0010,1001)
- (0010,1020)
- (0010,1030)
- (0010,1090)
- (0010,2160)
- (0010,2180)
- (0010,21B0)
- (0010,4000)
- (0018,1000)
- (0018,1030)
 (0020,0010) := "MR1"
- (0020,0052)
- (0020,0200)
- (0020,4000)
- (0032,1032)
- (0040,0275)
- (0040,A124)
- (0040,A730)
- (0088,0140)
- (3006,0024)
- (3006,00C2)
2.d Edit the spreadsheet (remap.csv file) that is generated as output.
This spreadsheet will contain all the columns you defined, plus some additional columns needed to uniquely identify each patient, study, and series.
Each new (remap) column should be filled with values. In some cases, some cells in the spreadsheet can be left blank: for a Patient-level remap, one value must be specified for each patient; if the spreadsheet contains multiple rows for each patient, the column needs only be filled in one row for each patient. Similarly, for a Study-level remap, the value need only be filled once. If you don't fill in a required cell, the remapper will complain. If you give, for example, a Patient-level remap column multiple values for a single patient, the remapper will complain.
2.e Run the remapper:
DicomRemapper -c remap-config-file.xml -o <path-to-output-directory> -v remap.csv [directory-1 ...]
- the remap config XML should be the same file used in 2.a,
- remap.csv is the spreadsheet generated in 2.c and edited in 2.d, and
- list of directories is the same list of source directories from 2.e.
- add an anonymization script to be applied at this stage by using the -d option.
- first time you use a script to generate new UIDs, you'll need a new UID root;
- do this by adding -s http://nrg.wustl.edu/UIDGen to the DicomRemapper command line.
NOTE DicomBrowser doesn't write directly into the database -- it can send to a DICOM server. Below we use webservices to write directly to the database. Does this violate best practices?
QUESTION How does data go from here into database -- via "admin" move from to db? How labor intensive is this?
TODO Yong: how-to on CHB instance. URI?
For next steps using web services, use curl or XNATRestClient (See here to download XNATRestClient in xnat_tools.zip from here: http://nrg.wikispaces.com/XNAT+REST+API+Usage)
3. Authenticate with server and create new session; use the response as a sessionID ($JSessionID) to use in subsequent queries
curl -d POST $XNE_Svr/REST/JSESSION -u $XNE_UserName:$XNE_Password
or, use the XNATRestClient
XNATRestClient -host $XNE_Svr -u $XNE_UserName -p $XNE_Password -m POST -remote /REST/JSESSION
4. Create subjects on XNAT
 XNATRestClient -host $XNE_Svr -user_session $JSessionID -m PUT /REST/projects/$ProjectID/subjects/s0001
(This will create a subject called 'S0001' within the project $ProjectID)
A script can be written to automatically create all subjects for the project.
4a. Specify the demographics of a subject already created, or create with demographic specification
4.a.1 No demographics are applied to each subject by default. To edit the demographics (like gender or handedness) of a subject already created using XML Path shortcuts.
xnat:subjectData/demographics[@xsi:type=xnat:demographicData]/gender = male
xnat:subjectData/demographics[@xsi:type=xnat:demographicData]/handedness = left
The entire command looks like this (Append XML path shortcuts and separate each by an &. Note that querystring parameters must be separated from the actual URI by a ?):
XNATRestClient -host $XNE_svr -user_session $JSessionID -m PUT -remote "/REST/projects/$ProjectID/subjects/s0001?xnat:subjectData/demographics[@xsi:type=xnat:demographicData]/gender=male&xnat:subjectData/demographics[@xsi:type=xnat:demographicData]/handedness=left"
All XML Path shortcuts that can be specified on commandline for projects, subject, experiments are listed here: http://nrg.wikispaces.com/XNAT+REST+XML+Path+Shortcuts
4.a.2 Alternatively, specify the demographics during subject creation by generating and uploading an xml file with the subject:
XNATRestClient -host $XNE_srv -user_session $JSessionID -m PUT -remote "/REST/projects/$ProjectID/subjects/s0002" - local ./$ProjectID_s0002.xml
The XML file you create and post looks like this:
<xnat:Subject ID="s0002" project="$ProjectID" group="control" label="1" src="12"  xmlns:xnat="http://nrg.wustl.edu/xnat" xmlns:xsi="http://www.w3.org/2001/XMLSchema-instance">
   <xnat:demographics xsi:type="xnat:demographicData">
       <xnat:dob>1990-09-08</xnat:dob>
       <xnat:gender>female</xnat:gender>
       <xnat:handedness>right</xnat:handedness>
       <xnat:education>12</xnat:education>
       <xnat:race>12</xnat:race>
       <xnat:ethnicity>12</xnat:ethnicity>
       <xnat:weight>12.0</xnat:weight>
       <xnat:height>12.0</xnat:height>
   </xnat:demographics>
</xnat:Subject>
4.b (optional check) Query the server to see what subjects have been created:
XNATRestClient -host $XNE_Svr -user_session $JSessionID -m GET -remote /REST/projects/$ProjectID/subjects
4.c Create experiments (collections of image data) you'd like to have for each subject
XNATRestClient -host $XNE_Svr -user_session $JSessionID -m PUT -remote "/REST/projects/$ProjectID/subjects/$SubjectID/experiments/MRExperiment?xnat:mrSessionData/date=01/02/09"
XNATRestClient -host $XNE_Svr -user_session $JSessionID -m PUT -remote "/REST/projects/$ProjectID/subjects/$SubjectID/experiments/CTExperiment1?xnat:ctSessionData/date=01/02/09"
XNATRestClient -host $XNE_Svr -user_session $JSessionID -m PUT -remote "/REST/projects/$ProjectID/subjects/$SubjectID/experiments/PETExperiment1?xnat:petSessionData/date=01/02/09"
4.d (optional check) Query the server to see what experiments have been created:
XNATRestClient -host $XNE_Svr -user_session $JSessionID -m GET -remote /REST/projects/$ProjectID/subjects/s0001/experiments?format=xml
5. Create uris for scans, reconstructions and upload them.
Note: when uploading images, it is good form to define the format of the images (DICOM, ANALYZE, etc) and the content type of the data. This will not translate any information in the DICOM header into metadata on the scan.
//create SCAN1
XNATRestClient -host $XNE_Svr -user_session $JSessionID -m PUT -remote "/REST/projects/$ProjectID/subjects/$SubjectID/experiments/$ExperimentID/scans/SCAN1?xnat:mrScanData/type=T1"

/upload SCAN1 files...
XNATRestClient -host $XNE_Svr -user_session $JSessionID -m PUT -remote "/REST/projects/$ProjectID/subjects/$SubjectID/experiments/$ExperimentID/scans/SCAN1/files/1232132.dcm?format=DICOM&content=T1_RAW" -local /data/subject1/session1/RAW/SCAN1/1232132.dcm


//create SCAN2
XNATRestClient -host $XNE_Svr -user_session $JSessionID -m PUT -remote "/REST/projects/$ProjectID/subjects/$SubjectID/experiments/$ExperimentID/scans/SCAN2?xnat:mrScanData/type=T2"

//upload SCAN2 files...
XNATRestClient -host $XNE_Svr -user_session $JSessionID -m PUT -remote "/REST/projects/$ProjectID/subjects/$SubjectID/experiments/$ExperimentID/scans/SCAN2/files/1232133.dcm?format=DICOM&content=T2_RAW" -local /data/subject1/session1/RAW/SCAN2/1232133.dcm


//create reconstruction 1
XNATRestClient -host $XNE_Svr -user_session $JSessionID -m PUT -remote "/REST/projects/$ProjectID/subjects/$SubjectID/experiments/$ExperimentID/reconstructions/session1_recon_0343?xnat:reconstructedImageData/type=T1_RECON"

//upload reconstruction 1 files...
XNATRestClient -host $XNE_Svr -user_session $JSessionID -m PUT -remote "/REST/projects/$ProjectID/subjects/$SubjectID/experiments/$ExperimentID/reconstructions/session1_recon_0343/files/0343.nfti?format=NIFTI" -local /data/subject1/session1/RECON/T1_0343/0343.nfti


//create reconstruction 2
XNATRestClient -host $XNE_Svr -user_session $JSessionID -m PUT -remote "/REST/projects/$ProjectID/subjects/$SubjectID/experiments/$ExperimentID/reconstructions/session1_recon_0344?xnat:reconstructedImageData/type=T2_RECON"

//upload reconstruction 2 files...
XNATRestClient -host $XNE_Svr -user_session $JSessionID -m PUT -remote "/REST/projects/$ProjectID/subjects/$SubjectID/experiments/$ExperimentID/reconstructions/session1_recon_0344/files/0344.nfti?format=NIFTI" -local /data/subject1/session1/RECON/T1_0344/0344.nfti
6. Confirm data is uploaded & represented properly with web GUI
Link title

