Difference between revisions of "Slicer3:UIEngineering"
| Line 56: | Line 56: | ||
* specify your module's source and binary Include directories in Slicer3/Application/GUI/CMakeLists.txt | * specify your module's source and binary Include directories in Slicer3/Application/GUI/CMakeLists.txt | ||
* and include your module in the CMakeLists.txt target link libraries | * and include your module in the CMakeLists.txt target link libraries | ||
| + | |||
| + | === Two GUI styles === | ||
| + | '''Two styles:''' Depending on whether you want a notebook-style GUI for your module (similar to the style used in Slicer2) or a set of stacked collapsible frames to contain different logical sections of your interface like "help" and "display", your BuildGUI() method can be written in one of two ways. The '''notebook style''' may be appropriate for modules with long logical sections within their GUI, to minimize the amount of scrolling required of a user. The '''collapsing style''' may be appropriate for modules that have numerous logical sections, since the amount of horizontal space across which a notebook would array them is limited. The way these two styles are expressed in Slicer3's GUI panel is shown below. | ||
| + | |||
| + | [[Image:S3ModuleStyles.png]] | ||
| + | |||
| + | '''''Collapsing style:''''' The GradientAnisotropicDiffusionFilter Module example implements the collapsible style, first adding a single new Page in its UIPanel: | ||
| + | |||
| + | this->UIPanel->AddPage ( "MyModule", "MyModule", NULL ); | ||
| + | |||
| + | then creating a vtkSlicerModuleCollapsibleFrame widget for each logical section in the GUI, parenting each to the UIPanel's single PageWidget, then creating, configuring and packing them from top to bottom in the UIPanel's PageWidget. Each logical section's widgets can be organized inside each of the vtkSlicerModuleCollapsibleFrames. The superclass has some helper methods to construct consisten Help&About Frames across modules. | ||
| + | |||
| + | //--- help and about frame | ||
| + | const char *help = "MyModule does the following..."; | ||
| + | const char *about = "This work was supported by..."; | ||
| + | vtkKWWidget *page = this->UIPanel->GetPageWidget ("MyModule"); | ||
| + | this->BuildHelpAndAboutFrame ( page, help, about ); | ||
| + | |||
| + | //--- rest of the frames | ||
| + | vtkSlicerModuleCollapsibleFrame *firstFrame = vtkSlicerModuleCollapsibleFrame::New ( ); | ||
| + | vtkSlicerModuleCollapsibleFrame *secondFrame = vtkSlicerModuleCollapsibleFrame::New ( ); | ||
| + | vtkSlicerModuleCollapsibleFrame *thirdFrame = vtkSlicerModuleCollapsibleFrame::New ( ); | ||
| + | vtkSlicerModuleCollapsibleFrame *forthFrame = vtkSlicerModuleCollapsibleFrame::New ( ); | ||
| + | ... | ||
| + | //--- parenting the frames to the same UIpanel page | ||
| + | firstFrame->SetParent ( page ); | ||
| + | secondFrame->SetParent ( page ); | ||
| + | ... | ||
| + | //--- parenting widgets to the various frames | ||
| + | this->widget2->SetParent ( firstFrame->GetFrame () ); | ||
| + | this->widget3->SetParent ( secondFrame->GetFrame () ); | ||
| + | |||
| + | '''''Notebook style:''''' To create a notebook style GUI (as there is no example yet, a little code will be included here), a new Page must be added to the UIPanel for every tab in the notebook: | ||
| + | |||
| + | //--- get a pointer to the KWUserInterfaceManagerNotebook | ||
| + | vtkKWUserInterfaceManagerNotebook *nbm = vtkKWUserInterfaceManagerNotebook::SafeDownCast ( this->UIPanel->GetUserInterfaceManager()); | ||
| + | //--- help and about frame | ||
| + | this->UIPanel->AddPage ( "Help&About", "Information about using this module", NULL ); | ||
| + | const char *help = "MyModule does the following..."; | ||
| + | const char *about = "This work was supported by..."; | ||
| + | vtkKWWidget *page = this->UIPanel->GetPageWidget ("Help"); | ||
| + | this->BuildHelpAndAboutFrame ( page, help, about ); | ||
| + | |||
| + | //--- pages for other frames | ||
| + | int page1ID = this->UIPanel->AddPage ( "First", "Functionality for some logical piece of module", NULL ); | ||
| + | int page2ID = this->UIPanel->AddPage ( "Second", "Functionality for another logical piece of module", NULL ); | ||
| + | |||
| + | //--- enabling or disabling notebook tabs | ||
| + | nbm->GetNotebook()->SetPageEnabled ( page1ID, 1 ); | ||
| + | nbm->GetNotebook()->SetPageEnabled ( page2ID, 0 ); | ||
| + | |||
| + | Widgets to be packed within each notebook page are parented to the PageWidget: | ||
| + | |||
| + | this->widget2->SetParent ( this->UIPanel->GetPageWidget ( "First" ) ); | ||
| + | this->widget3->SetParent ( this->UIPanel->GetPageWidget ( "Second" ) ); | ||
| + | |||
| + | or can be parented to a widget already parented to the PageWidget. Then they themselves can be created, configured, and packed in the same manner as they are in the GradientAnisotropicDiffusionFilter Module. | ||
| + | |||
=== Current status and TO-DO === | === Current status and TO-DO === | ||
Revision as of 16:14, 10 January 2007
Home < Slicer3:UIEngineeringReturn to Slicer3 Interface Design and Usability
Contents
Slicer3 GUI layer architecture and engineering
GUI architecture and interface to application layer
Our goal is to create a thin GUI layer for Slicer3 whose architecture allows the flexible expression of interfaces that are appropriate for Slicer’s different use scenarios: an end-user application graphical user interface; script-driven batch processing and unit testing; and command-line style interaction for launching pipeline/grid processing, debugging during development, etc.
Slicer2's GUI code is quite dense, mixed in with application control logic and data model. There is no way to separate the gui from the rest of the Slicer2 application which limits the ability to perform automated tests of modules and makes development and maintenance of software more challenging. To meet our goal, the Slicer3 architecture requires a thoughtful translation of existing Slicer2 modules' functionality, and won't be as simple as dropping in a new set of widgets. The aim is to provide a framework that makes this task as easy as possible for Slicer developers while separating the Slicer3 GUI code from the application layer.
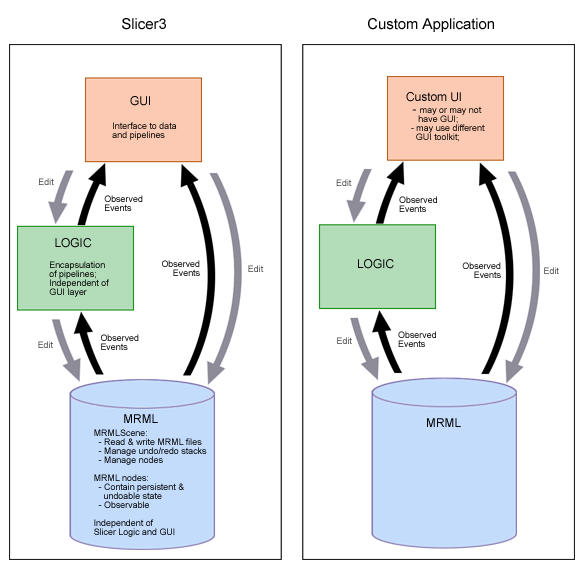
The schematic below shows the Slicer3 GUI layer design and its interface with the application layer (which includes the logic layer and the data model as shown). The design isolates the application layers from GUI code, allowing them to be invoked by the Slicer3 desktop application and GUI (Slicer3), or a custom application with or without a graphical user interface, or which may use a completely different GUI toolkit.
User input to the GUI layer modifies parameters in the MRML scene and Logic classes, and updates and executes pipelines. So that the GUI can accurately reflect application state, it maintains observers on the MRML scene, MRML nodes, and Logic objects; when the application state encapsulated in the parameters of those objects changes, events are generated, then observed and processed by the GUI to update its widgets' transient state (like entry widgets or scale values, and rendered image output).
The GUI's visual style is being designed to reflect Slicer3 brand. Developers are encouraged to adhere to style guidelines to maintain a consistent look and feel across core and custom modules and to make Slicer3 easier to learn. The style is defined and described by the Tk Options Database configured by a Slicer3 class (vtkSlicerTheme.h/cxx). These options can be overridden in an module's GUI, if a developer finds this necessary, by redefining new Tk options for widgets defined there.
How to add a Slicer module (MyModule) GUI class
First, note that the GUI base classes may be refactored as Slicer develops and the procedure for adding your module into Slicer will also be simplified; it's recommended that you check documentation periodically for information that may be useful.
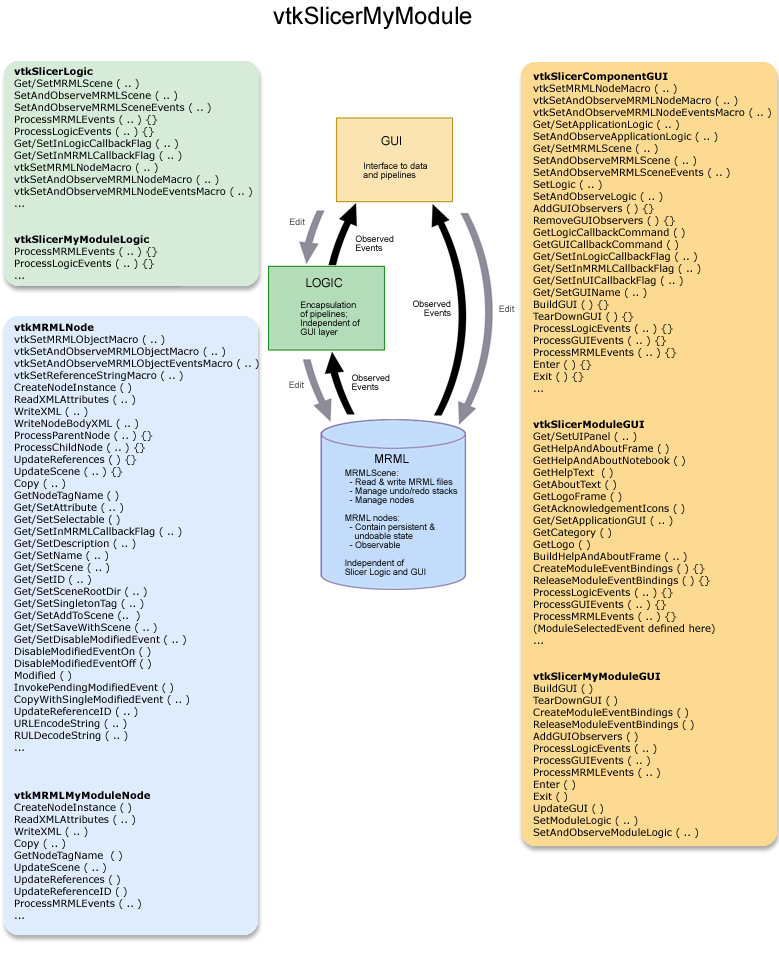
The figure below shows an overview of the three classes a new module (called MyModule for example) will probably need to define:
- vtkSlicerMyModuleGUI,
- vtkSlicerMyModuleLogic,
- vtkMRMLMyModuleNode
and some of the methods those classes should include to utilize the Slicer3 infrastructure. These classes should reside in the slicer3/Modules/MyModule/ directory.
Deriving your GUI class: To create a Module GUI that expresses its interface in Slicer's shared UIpanel, derive your class (vtkSlicerMyModuleGUI) from vtkSlicerModuleGUI. For a Module GUI that expresses its interface in a different panel of the Main Slicer Window, or in a toplevel widget, derive vtkSlicerMyModuleGUI from vtkSlicerComponentGUI instead. Your GUI class will inherit application logic and MRML pointers, an API for setting and observing them, and a framework for defining MRML, Logic and GUI callbacks from its parent class. Specific mediator methods, other logic and MRML node pointers can be added to the module's class definition. Importantly, keep logic and MRML classes independent of the GUI to facilitate testing and command-line execution possible *without* instantiating the Slicer3 GUI.
Example: An early example to work from is the GradientAnisotropicDiffusionFilter (GAD) Module; define all the widgets you need within the class and create Get Macros for each of them. Define the methods you need from vtkSlicerComponentGUI, including BuildGUI(); in this method, you'll first add a page to the class's UIPanel (for now, only create one page). Different logical sections of your interface like "Parameterize" or "Display options" (which were located in separate notebook tabs in Slicer2) will be located in instances of the vtkKWFrameWithLabel widget, and packed into the UIPanel page. This approach produces a vertical stack of collapsing frames in the UIPanel instead of horizontally arrayed tabs. The "Help&About" frame should be located first (at the top) in the stack of your module GUI's set of collapsing frames; a method to help create this frame in a consistent manner is inherited from the vtkSlicerModuleGUI base class. In your derived module's BuildGUI() method, after adding your module's page to the UIpanel, define a text string for 'help', and one for 'about' if you wish to make acknowledgements, and call the BuildHelpAndAboutFrame(page, helpstr, aboutstr).
Methods to define: Define the methods you require from vtkSlicerComponentGUI base class, like: AddGUIObservers(), RemoveGUIObservers(), ProcessLogicEvents(), ProcessGUIEevents(), ProcessMRMLEvents(), Enter() and Exit(); and whatever else your module needs. (Eventually, available modules will be automatically detected, but this is not yet implemented; then, the Enter() method will probably be made to call the BuildGUI() method. For now, instantiate your class in Slicer3.cxx and call its BuildGUI() and other methods, following the pattern for other modules established there.)
Adding observers: In AddGUIObservers, add an observer on each widget whose events you want to process. When an event is observed, the ProcessGUIEvents() method is called via the GUICallbackCommand; define this class to propagate information from the GUI to logic and MRML. Though it is tempting, try not to use ProcessGUIEvents() to update the GUI state directly -- just modify the Logic and MRML state, and allow observers on the logic and MRML to trigger subsequent processing in your ProcessLogicEvents() and ProcessMRMLEvents() methods to bring that state change BACK into the GUI. To prevent infinite looping, check to see if the GUI and Logic/MRML parameters are out of sync, and only update the GUI if necessary.
Removing observers: In RemoveGUIObservers, make sure you remove every observer you've added to widgets in the GUI before calling Delete() on your widget. Make sure you call SetAndObserveMRML() and SetAndObserveLogic( ) with NULL pointers in your GUI class destructor to remove all observers on MRML and Logic that you have created.
Defining your own widgets: Currently there are two types of new widgets, those defined as extensions to vtkKW (like vtkKWWindowLevelThresholdEditor.h/cxx) and those defined as Slicer-specific widgets, (like vtkSlicerSliceControlWidget.h/cxx, derived from the vtkSlicerWidget.h/cxx base class). The Slicer widgets have methods for putting observers on their widget components, Logic and MRML, and processing events as well. Thus GUI classes that instance them do not have to manage events for them if the widgets' methods are used instead.
Undo: Make sure you process those events that mark junctures at which MRML state should be saved for Undo/Redo (using MRML's SaveStateForUndo() method. For instance, when an entry widget's value has changed, before changing a parameter in the appropriate MRML node, make a call to the MRMLScene's SaveStateForUndo() method with that node as a parameter. Save MRML state at reasonable junctures: for instance, for scale widgets, save MRML state when the scale starts changing, rather than continuously as the scale changes. For an example of they way SaveStateForUndo() is called, see slicer3/Base/GUI/vtkSlicerSliceControllerWidget.cxx.
Keyboard accelerators (hotkeys): Before defining hot-keys for your module, please check the table of global hotkeys, and other module-specific assignments (Slicer3 Event Bindings). If a key is already globally assigned, it may not be re-assigned in your module. If other modules are using a key for similar functionality, try to use the same key in your module too, for consistency.
GUI Style: Try not to add style elements (like foreground and background color, font, relief, etc.) to the interface you create; let the options database (as set up by the vtkSlicerTheme class) specify the style for you so that all modules appear consistent within the Slicer3 application.
Files you will have to touch: At the current time, to incorporate your module into Slicer, you need to take a number of steps:
- create your own CMakeLists.txt file and your own vtkMyModuleWin32Header.h file following the pattern set by other Modules.
- add your module SUBDIR to the CMakeLists.txt file in the Slicer3/Modules directory above.
- to add your module to Slicer3, create a new instance of vtkSlicerMyModuleLogic and vtkSlicerMyModuleGUI in Slicer3/Applications/GUI/Slicer3.cxx, and follow the pattern used by other modules, like the GradientAnisotropicDiffusionFilter module.
- include relevant .h files in Slicer3/Applications/GUI/Slicer3.cxx, and
- specify your module's source and binary Include directories in Slicer3/Application/GUI/CMakeLists.txt
- and include your module in the CMakeLists.txt target link libraries
Two GUI styles
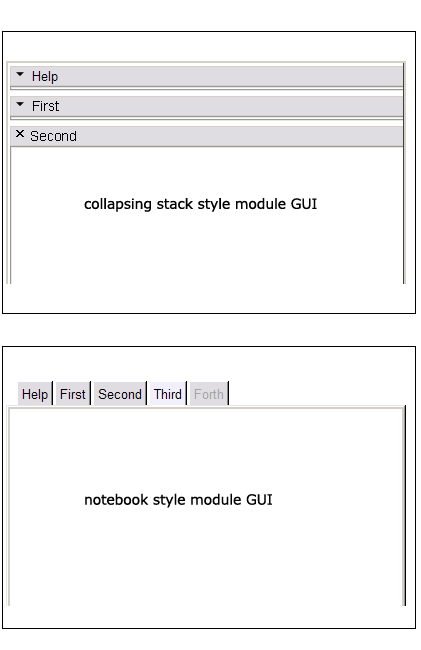
Two styles: Depending on whether you want a notebook-style GUI for your module (similar to the style used in Slicer2) or a set of stacked collapsible frames to contain different logical sections of your interface like "help" and "display", your BuildGUI() method can be written in one of two ways. The notebook style may be appropriate for modules with long logical sections within their GUI, to minimize the amount of scrolling required of a user. The collapsing style may be appropriate for modules that have numerous logical sections, since the amount of horizontal space across which a notebook would array them is limited. The way these two styles are expressed in Slicer3's GUI panel is shown below.
Collapsing style: The GradientAnisotropicDiffusionFilter Module example implements the collapsible style, first adding a single new Page in its UIPanel:
this->UIPanel->AddPage ( "MyModule", "MyModule", NULL );
then creating a vtkSlicerModuleCollapsibleFrame widget for each logical section in the GUI, parenting each to the UIPanel's single PageWidget, then creating, configuring and packing them from top to bottom in the UIPanel's PageWidget. Each logical section's widgets can be organized inside each of the vtkSlicerModuleCollapsibleFrames. The superclass has some helper methods to construct consisten Help&About Frames across modules.
 //--- help and about frame
 const char *help = "MyModule does the following...";
 const char *about = "This work was supported by...";
 vtkKWWidget *page = this->UIPanel->GetPageWidget ("MyModule");
 this->BuildHelpAndAboutFrame ( page, help, about );
 //--- rest of the frames
 vtkSlicerModuleCollapsibleFrame *firstFrame = vtkSlicerModuleCollapsibleFrame::New ( );
 vtkSlicerModuleCollapsibleFrame *secondFrame = vtkSlicerModuleCollapsibleFrame::New ( );
 vtkSlicerModuleCollapsibleFrame *thirdFrame = vtkSlicerModuleCollapsibleFrame::New ( );
 vtkSlicerModuleCollapsibleFrame *forthFrame = vtkSlicerModuleCollapsibleFrame::New ( );
 ...
 //--- parenting the frames to the same UIpanel page
 firstFrame->SetParent ( page );
 secondFrame->SetParent ( page );
 ...
 //--- parenting widgets to the various frames
 this->widget2->SetParent ( firstFrame->GetFrame () );
 this->widget3->SetParent ( secondFrame->GetFrame () );
Notebook style: To create a notebook style GUI (as there is no example yet, a little code will be included here), a new Page must be added to the UIPanel for every tab in the notebook:
 //--- get a pointer to the KWUserInterfaceManagerNotebook
 vtkKWUserInterfaceManagerNotebook *nbm = vtkKWUserInterfaceManagerNotebook::SafeDownCast ( this->UIPanel->GetUserInterfaceManager());
 //--- help and about frame
 this->UIPanel->AddPage ( "Help&About", "Information about using this module", NULL );
 const char *help = "MyModule does the following...";
 const char *about = "This work was supported by...";
 vtkKWWidget *page = this->UIPanel->GetPageWidget ("Help");
 this->BuildHelpAndAboutFrame ( page, help, about );
 //--- pages for other frames
 int page1ID = this->UIPanel->AddPage ( "First", "Functionality for some logical piece of module", NULL );
 int page2ID = this->UIPanel->AddPage ( "Second", "Functionality for another logical piece of module", NULL );
 //--- enabling or disabling notebook tabs
 nbm->GetNotebook()->SetPageEnabled ( page1ID, 1 );
 nbm->GetNotebook()->SetPageEnabled ( page2ID, 0 );
Widgets to be packed within each notebook page are parented to the PageWidget:
 this->widget2->SetParent ( this->UIPanel->GetPageWidget ( "First" ) );
 this->widget3->SetParent ( this->UIPanel->GetPageWidget ( "Second" ) );
or can be parented to a widget already parented to the PageWidget. Then they themselves can be created, configured, and packed in the same manner as they are in the GradientAnisotropicDiffusionFilter Module.
Current status and TO-DO
The existing base classes form a basic framework for the UI. For the Alpha deadline, we provided a main application window with the general layout described in our current design. For the Beta deadline, we are focusing on:
- clean up vtkDebug Leaks
- copyright existing icons and logo
- working on improving the Theme to enhance module GUI appearance and readability,
- implementing functionality for view control widgets,
- implementing lightbox viewer
Return to TOC


