Difference between revisions of "Projects:ARRA:SlicerEM:AtlasCreator"
| Line 36: | Line 36: | ||
# only resample filenames which exist in registration and vice versa | # only resample filenames which exist in registration and vice versa | ||
# don't use Slicer temp dir anymore, use a temp dir in the output dir instead | # don't use Slicer temp dir anymore, use a temp dir in the output dir instead | ||
| + | # show for dynamic and fixed template the average intensity mask across all aligned inputs | ||
== Design == | == Design == | ||
Revision as of 20:52, 2 March 2011
Home < Projects:ARRA:SlicerEM:AtlasCreatorContents
Atlas Creator
The Atlas Creator combines existing segmentations to an anatomical atlas based on robust statistics.
Examples
Examples have to be re-generated.. Coming soon!
GUI
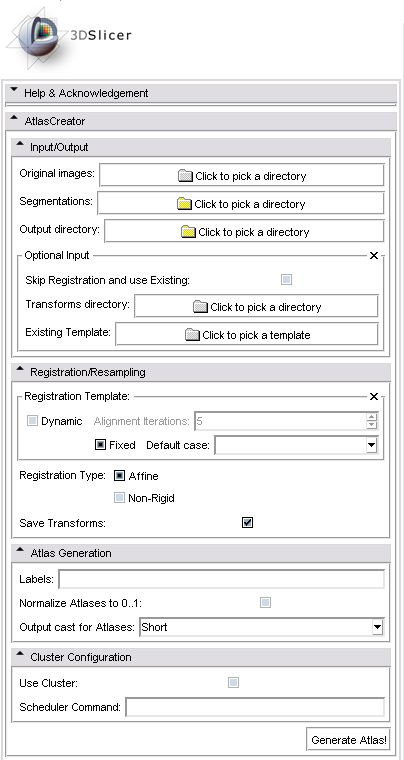
The following screenshot shows the graphical user interface of the Atlas Creator module in 3D Slicer Version 3.
Priority List
The priority list reflects the open issues.
Re-structure Atlas Creator code according to the Design specified belowImplement dynamic registrationWatch out for overflows
Implement support for parallel ComputationAdd Helpand Online Documentationcheck how to include C++ code in AtlasCreatorcreate concept
make KilisSandbox work with PCA- create AtlasCreator MRML Node (80%)
- update documentation page
- include CMTK as alternative to BRAINSFit (99%)
- Include PCA functionality in AtlasCreator
- add the ability to normalize to 0..X instead of only 0..1
create outputDir automatically- add ability to specify wait time for cluster mode
Solve Double/Float Problem- return as output the normalized intensity maps of aligned cases in the static mode
- only resample filenames which exist in registration and vice versa
- don't use Slicer temp dir anymore, use a temp dir in the output dir instead
- show for dynamic and fixed template the average intensity mask across all aligned inputs
Design
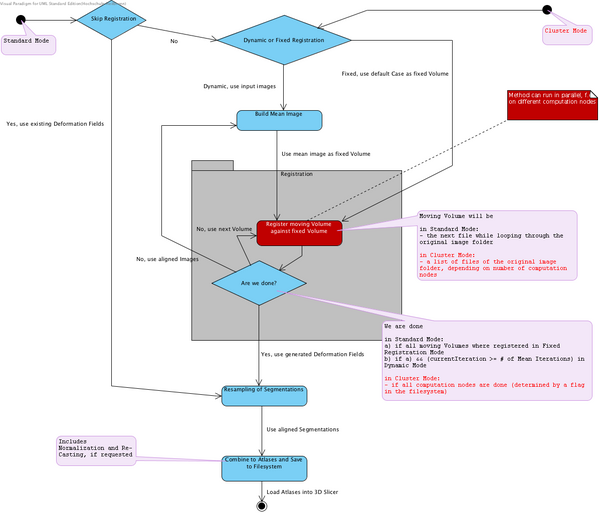
The following State Machine diagram shows the flow of the Atlas Creator logic. It can be run in two modes:
- Normal mode, all computations on one machine
- Cluster mode, parallelized computations
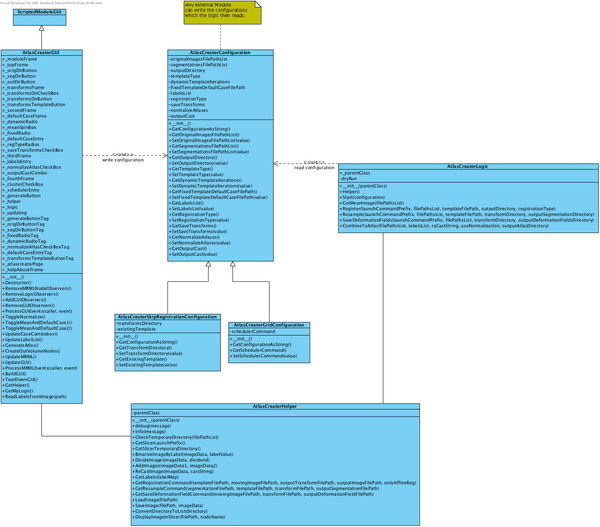
The following class diagram shows the structure of the module.
Proposal: Configuration of the Atlas Creator logic
The Atlas Creator supports different modes of operation. For now, we focus on Skip Registration Mode, Normal Mode and Cluster Mode.
To configure an Atlas Creator operation, we introduce configuration containers. The following example shows how to create the configuration:
# configuration for a Normal Mode operation
configuration = AtlasCreatorConfiguration()
# define the parameters
configuration.SetTemplateType("fixed")
...
self._logic.Start(configuration)

# configuration for a Cluster Mode operation
gridConfiguration = AtlasCreatorGridConfiguration()
# define the same parameters as above
gridConfiguration.SetTemplateType("fixed")
...
# and also additional cluster specific parameters
gridConfiguration.SetSchedulerCommand("stageClusterJob.sh")
...
self._logic.Start(configuration)
The logic detects which operation scenario was configured and then adjusts the workflow accordingly. This concept can be easily extended for future operation modes.
Proposal: Running the Atlas Creator in a Grid Environment
The Atlas Creator concept supports parallelized computations. An existing grid environment can be leveraged during the Registration phase as shown in the diagram above.
Only the Registration can be performed parallelized since it is the most time-consuming task in the Atlas Creator pipeline.
The Atlas Creator module runs on one node in the cluster (most likely the head node) and then generates bash scripts which start the registration using the 3D Slicer launch mechanism. These scripts can be run using an existing scheduler or a similar mechanism and use the Python invokation method shown in the section below. An existing $DISPLAY environment is not necessary for using the 3D Slicer launch mechanism.
The module immediately recognizes if the parallelized registration jobs are complete and then continues the pipeline on the node where the it was first started.
The Atlas Creator Command Line Interface
The Atlas Creator comes with a command line interface. This interface can be used by invoking the following command.
# in the source directory
cd Slicer3/Modules/AtlasCreator/

# or in the build directory
cd Slicer3-build/lib/Slicer3/Modules/AtlasCreator/

# start the command line interface
python atlascreator.py
A detailed help system is available by calling python atlascreator.py --help:
21:42:17 daniel@sbia-pc66:~/SLICER/TRUNK/Slicer3/Modules/AtlasCreator$ python atlascreator.py --help
AtlasCreator for 3D Slicer
Version v0.1

Usage:

-h, --help
        Show this information.

-i, --images DIR
        Directory containing original images.

-s, --segmentations DIR
        Directory containing segmentations.

-o, --output DIR
        Output directory.

--skipRegistration
        Skip the registration and use existing transforms.

        The following arguments have to be specified if the registration is skipped:

        --transforms DIR
                Directory containing existing transforms.

        --existingTemplate FILEPATH
                Filepath to an existing template used for resampling only.

--dynamic
        Use a dynamic template for registration based on means of images.

        The following arguments have to be specified if dynamic registration is chosen:

        -m, --meanIterations INT
                Number of iterations to compute and register against a mean image.

--fixed
        Use a fixed template for registration.

        The following arguments have to be specified if fixed registration is chosen:

        --template FILEPATH
                Filepath to an image used as a template for fixed registration.

-n, --non-rigid
        Use Non-Rigid registration additionally.

-w, --writeTransforms
        Write transforms to output directory.

-l, --labels STRING
        List of labels to include for the atlases, f.e. "3 4 5 6 8 10".

--normalize
        Normalize Atlases to 0..1.
        If activated, the output cast will be set to Float.

--outputCast INT
        Output cast for the atlases. Possible values:
        0: Char
        1: Unsigned Char
        2: Double
        3: Float
        4: Int
        5: Unsigned Int
        6: Long
        7: Unsigned Long
        8: Short
        9: Unsigned Short
        DEFAULT: 8

-c, --cluster
        Use the cluster mode.

        The following arguments have to be specified if cluster mode is chosen:

        --schedulerCommand EXECUTABLE
                The executable to use as a scheduler in cluster mode, f.e. "qsub-run".

--slicer FILEPATH
        Filepath to the 3D Slicer launcher including arguments, f.e. "/usr/bin/Slicer3 --tmp_dir /var/tmp".
        DEFAULT: Find the 3D Slicer launcher automatically.

-d, --debug
        Enable debug information.

--dryrun
        Output executable commands instead of running the registration or resampling.

--examples
        Show usage examples.


Developed by Daniel Haehn and Kilian Pohl, University of Pennsylvania. The research was funded by an ARRA supplement to NIH NCRR (P41 RR13218).

Thanks to everyone!
Usage examples can be displayed by calling python atlascreator.py --examples:
21:42:13 daniel@sbia-pc66:~/SLICER/TRUNK/Slicer3/Modules/AtlasCreator$ python atlascreator.py --examples
AtlasCreator for 3D Slicer
Version v0.1

Examples:
-----------------------------------------------------------------------------------------------
1. Run fixed registration with the testdata:

        python atlascreator.py -i TestData/originals/ -s TestData/segmentations/ -o /tmp/acout --fixed --template TestData/originals/case62.nrrd -w -l "3 4 5 6 7 8 9" --normalize

-----------------------------------------------------------------------------------------------
2. Run dynamic registration with the testdata:

        python atlascreator.py -i TestData/originals/ -s TestData/segmentations/ -o /tmp/acout --dynamic --meanIterations 5 -w -l "3 4 5 6 7 8 9" --normalize

-----------------------------------------------------------------------------------------------
3. Run dynamic registration with the testdata on a cluster (scheduler command "qsub-run"):

        python atlascreator.py -i TestData/originals/ -s TestData/segmentations/ -o /tmp/acout --dynamic --meanIterations 5 -w -l "3 4 5 6 7 8 9" --normalize --cluster --schedulerCommand qsub-run

-----------------------------------------------------------------------------------------------
4. Use existing registrations and just re-sample

        python atlascreator.py --skipRegistration --transforms /tmp/acout --existingTemplate TestData/segmentations/case62.nrrd -s TestData/segmentations/ -o /tmp/acout -l "3 4 5 6 7 8 9" --normalize --outputCast 3
Invoking the Atlas Creator logic externally
The Atlas Creator logic can be invoked via Python, f.e. from another 3D Slicer module or the 3D Slicer Python console.
To access the Atlas Creator logic, the following snippet is useful:
from Slicer import slicer

# get the path to the Atlas Creator module
pathToAtlasCreator = str(slicer.Application.GetModulePaths()) + '/AtlasCreator'

# add it to the python sys path
sys.path.append(pathToAtlasCreator)

# import the Atlas Creator module
from AtlasCreatorGUI import *

# instantiate the Atlas Creator gui, needed for debug statements on the console
# and automatically creates the logic
gui = AtlasCreatorGUI()

# get the Atlas Creator logic
logic = gui.GetMyLogic()

# create configuration
configuration = AtlasCreatorConfiguration()
# configure now using the setters...

# work with the logic
logic.Start(configuration)


