Difference between revisions of "Slicer3:How to implement an Interactive Module GUI"
| Line 1: | Line 1: | ||
| − | = | + | = How to implement a Slicer3 Interactive Module GUI = |
== Virtual Methods == | == Virtual Methods == | ||
Revision as of 19:24, 19 June 2007
Home < Slicer3:How to implement an Interactive Module GUIHow to implement a Slicer3 Interactive Module GUI
Virtual Methods
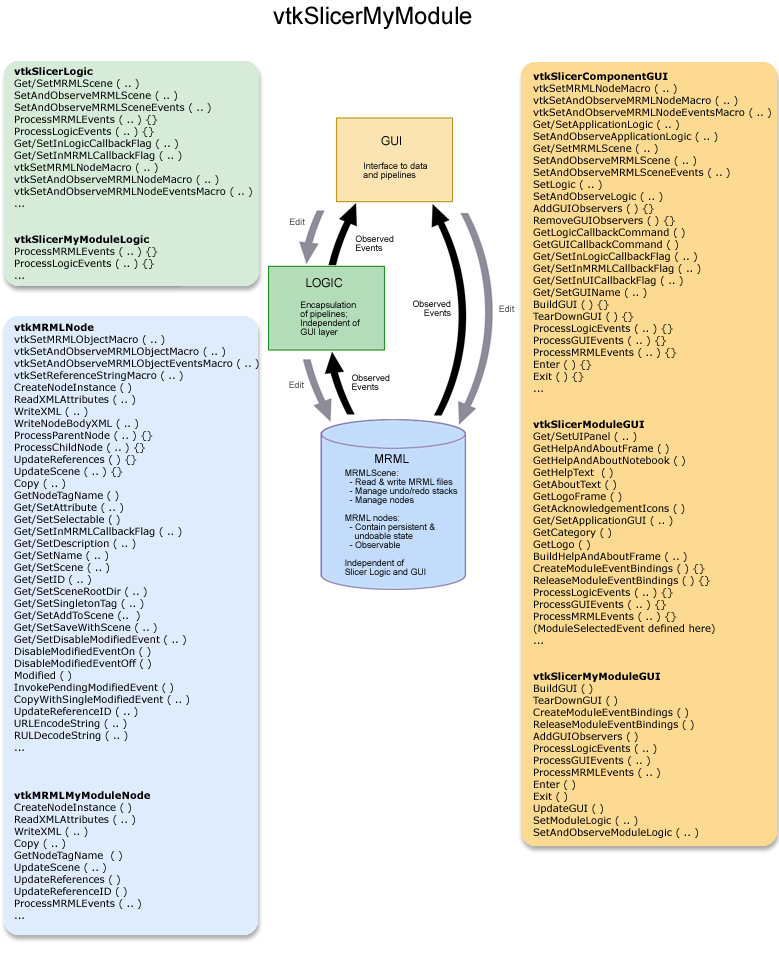
At the slicer-developers tcon 2007-02-13, we discussed some adjustments to the virtual methods in vtkSlicerModuleGUI for better consistency and utility. The following list defines the methods that a module needs to implement so the main application (Slicer3.cxx) can operate on all modules generically:
The following methods are defined by the vtkSlicerModuleGUI and typically won't be overriden:
- Enter
- called when module is raised
- calls CreateGUI if needed (instance variable tracks create state)
- calls AddGUIObservers
- calls UpdateGUI
- Exit
- called when module is replaced by another
- calls RemoveMRMLObservers
The following methods should be defined by the Module to implement the specific behavior:
- CreateGUI
- instances and packs widgets
- DestroyGUI
- typically called only by destructor
- breaks any reference cycles
- Deletes widgets
- ProcessGUIEvents
- responds to events from widgets or slicer GUI classes
- propagates data from GUI into MRML nodes
- ProcessMRMLEvents
- responds to updates to MRML nodes
- propagates data from MRML to widgets
- AddGUIObservers
- set observers on widgets and GUI classes (use GUICallbackCommand local instance -- it will call ProcessGUIEvents)
- AddMRMLObservers
- set observers on MRML nodes and scene (use MRMLCallbackCommand local instance -- it will call ProcessMRMLEvents)
- RemoveGUIObservers
- RemoveMRMLObservers
- UpdateGUI
- copy state from MRML nodes to GUI/Widgets
- if needed for efficiency, check the MTime for the MRML Node and the corresponding GUI and only update if needed (e.g. for a MultiColumnList or other widget the holds a lot of data)
- UpdateMRML
- copy state from GUI/Widgets to MRML
Usage
NOTE: this description will change due to current ongoing changes to the module GUI base classes. The figure below shows a current overview of the three classes a new module (called MyModule for example) will need to define (vtkSlicerMyModuleGUI, vtkSlicerMyModuleLogic and vtkMRMLMyModuleNode) and some of the methods those classes should include to utilize the Slicer3 infrastructure. These classes should reside in the slicer3/Modules/MyModule/ directory.
Deriving your GUI class: To create a Module GUI that expresses its interface in Slicer's shared UIpanel, derive your class (vtkSlicerMyModuleGUI) from vtkSlicerModuleGUI. For a Module GUI that expresses its interface in a different panel of the Main Slicer Window, or in a toplevel widget, derive vtkSlicerMyModuleGUI from vtkSlicerComponentGUI instead. Your GUI class will inherit application logic and MRML pointers, an API for setting and observing them, and a framework for defining MRML, Logic and GUI callbacks from its parent class. Specific mediator methods, other logic and MRML node pointers can be added to the module's class definition. Importantly, keep logic and MRML classes independent of the GUI to facilitate testing and command-line execution possible *without* instantiating the Slicer3 GUI.
Example: An early example to work from is the GradientAnisotropicDiffusionFilter Module; define all the widgets you need within the class and create Get Macros for each of them. Define the methods you need from vtkSlicerModuleGUI and its parent class vtkSlicerComponentGUI, including BuildGUI(); in this method, you'll first add a page to the class's UIPanel (for now, only create one page).
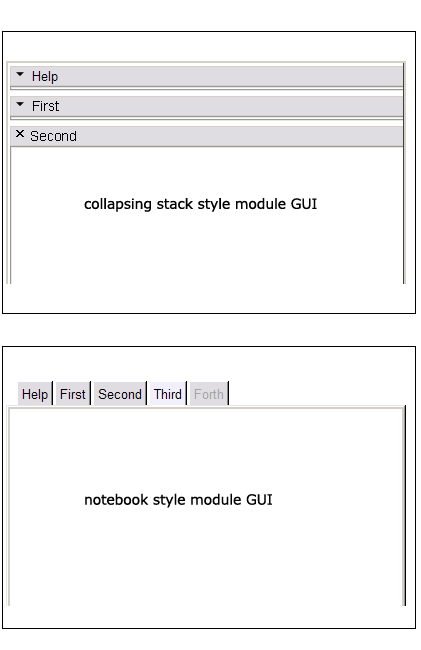
Two GUI styles
Two styles: Depending on whether you want a notebook-style GUI for your module (similar to the style used in Slicer2) or a set of stacked collapsible frames to contain different logical sections of your interface like "help" and "display", your BuildGUI() method can be written in one of two ways. The notebook style may be appropriate for modules with long logical sections within their GUI, to minimize the amount of scrolling required of a user. The collapsing style may be appropriate for modules that have numerous logical sections, since the amount of horizontal space across which a notebook would array them is limited. The way these two styles are expressed in Slicer3's GUI panel is shown below.
Collapsing style: The GradientAnisotropicDiffusionFilter Module example implements the collapsible style, first adding a single new Page in its UIPanel:
this->UIPanel->AddPage ( "MyModule", "MyModule", NULL );
then creating a vtkSlicerModuleCollapsibleFrame widget for each logical section in the GUI, parenting each to the UIPanel's single PageWidget, then creating, configuring and packing them from top to bottom in the UIPanel's PageWidget. Each logical section's widgets can be organized inside each of the vtkSlicerModuleCollapsibleFrames. The superclass has some helper methods to construct consisten Help&About Frames across modules.
 //--- help and about frame
 const char *help = "MyModule does the following...";
 const char *about = "This work was supported by...";
 vtkKWWidget *page = this->UIPanel->GetPageWidget ("MyModule");
 this->BuildHelpAndAboutFrame ( page, help, about );
 //--- rest of the frames
 vtkSlicerModuleCollapsibleFrame *firstFrame = vtkSlicerModuleCollapsibleFrame::New ( );
 vtkSlicerModuleCollapsibleFrame *secondFrame = vtkSlicerModuleCollapsibleFrame::New ( );
 vtkSlicerModuleCollapsibleFrame *thirdFrame = vtkSlicerModuleCollapsibleFrame::New ( );
 vtkSlicerModuleCollapsibleFrame *forthFrame = vtkSlicerModuleCollapsibleFrame::New ( );
 ...
 //--- parenting the frames to the same UIpanel page
 firstFrame->SetParent ( page );
 secondFrame->SetParent ( page );
 ...
 //--- parenting widgets to the various frames
 this->widget2->SetParent ( firstFrame->GetFrame () );
 this->widget3->SetParent ( secondFrame->GetFrame () );
Notebook style: To create a notebook style GUI (as there is no example yet, a little code will be included here), a new Page must be added to the UIPanel for every tab in the notebook:
 //--- get a pointer to the KWUserInterfaceManagerNotebook
 vtkKWUserInterfaceManagerNotebook *nbm = vtkKWUserInterfaceManagerNotebook::SafeDownCast ( this->UIPanel->GetUserInterfaceManager());
 //--- help and about frame
 this->UIPanel->AddPage ( "Help&About", "Information about using this module", NULL );
 const char *help = "MyModule does the following...";
 const char *about = "This work was supported by...";
 vtkKWWidget *page = this->UIPanel->GetPageWidget ("Help");
 this->BuildHelpAndAboutFrame ( page, help, about );
 //--- pages for other frames
 int page1ID = this->UIPanel->AddPage ( "First", "Functionality for some logical piece of module", NULL );
 int page2ID = this->UIPanel->AddPage ( "Second", "Functionality for another logical piece of module", NULL );
 //--- enabling or disabling notebook tabs
 nbm->GetNotebook()->SetPageEnabled ( page1ID, 1 );
 nbm->GetNotebook()->SetPageEnabled ( page2ID, 0 );
Widgets to be packed within each notebook page are parented to the PageWidget:
 this->widget2->SetParent ( this->UIPanel->GetPageWidget ( "First" ) );
 this->widget3->SetParent ( this->UIPanel->GetPageWidget ( "Second" ) );
or can be parented to a widget already parented to the PageWidget. Then they themselves can be created, configured, and packed in the same manner as they are in the GradientAnisotropicDiffusionFilter Module.
Defining methods
Methods to define: Define the methods you require from vtkSlicerComponentGUI base class, like: AddGUIObservers(), RemoveGUIObservers(), ProcessLogicEvents(), ProcessGUIEevents(), ProcessMRMLEvents(), Enter() and Exit(); and whatever else your module needs. (Eventually, available modules will be automatically detected, but this is not yet implemented; then, the Enter() method will probably be made to call the BuildGUI() method. For now, instantiate your class in Slicer3.cxx and call its BuildGUI() and other methods, following the pattern for other modules established there.)
Adding and removing observers
Adding observers: In AddGUIObservers, add an observer on each widget whose events you want to process. When an event is observed, the ProcessGUIEvents() method is called via the GUICallbackCommand; define this class to propagate information from the GUI to logic and MRML. Though it is tempting, try not to use ProcessGUIEvents() to update the GUI state directly -- just modify the Logic state, and allow observers on the logic and subsequent processing in ProcessLogicEvents() and ProcessMRMLEvents() to bring that state change BACK into the GUI.
Removing observers: In RemoveGUIObservers, make sure you remove every observer you've added to widgets in the GUI before calling Delete() on your widget. Make sure you call SetAndObserveMRML() and SetAndObserveLogic( ) with NULL pointers in your GUI class destructor to remove all observers on MRML and Logic that you have created.
Adding and removing references
For convenience, you may want to define pointers to Slicer's MainViewer, or to the SliceViewers, etc. Before Delete() can be called on anything you are referencing, you'll need to release the references. (Failure to release references can result in vtkDebugLeak reports on Application exit). The virtual method TearDownGUI() (inherited from vtkSlicerComponentGUI) can be defined for this purpose. References may be released in this method, and you can also use this method to call RemoveGUIObservers() if you don't want to explicitly call that method.
Defining new widgets
Defining your own widgets: The framework for doing this is still evolving. Currently there are two types of new widgets, those defined as extensions to vtkKW (like vtkKWWindowLevelThresholdEditor.h/cxx) and those defined as Slicer-specific widgets, (like vtkSlicerSliceControlWidget.h/cxx, derived from the vtkSlicerWidget.h/cxx base class). The Slicer widgets have methods for putting observers on their widget components, Logic and MRML, and processing events as well. Thus GUI classes that instance them do not have to manage events for them if the widgets' methods are used instead.
Using Undo and Redo
Undo: Make sure you process those events that mark junctures at which MRML state should be saved for Undo/Redo (using MRML's SaveStateForUndo() method. For instance, when an entry widget's value has changed, before changing a parameter in the appropriate MRML node, make a call to the MRMLScene's SaveStateForUndo() method with that node as a parameter. Save MRML state at reasonable junctures: for instance, for scale widgets, save MRML state when the scale starts changing, rather than continuously as the scale changes. For an example of they way SaveStateForUndo() is called, see slicer3/Base/GUI/vtkSlicerSliceControllerWidget.cxx. A detailed description of how undo/redo works, and how to use it in your module is available here.
Adding the module to the rest of Slicer3
Other files you will have to touch: For now, to add your module to Slicer3, create a new instance of vtkSlicerMyModuleLogic and vtkSlicerMyModuleGUI in Applications/GUI/Slicer3.cxx, and follow the pattern used by the GradientAnisotropicDiffusionFilter module for now, until the framework is developed for Slicer3 to autodetect your module and do the right things. Then:
- create your own CMakeLists.txt file and your own vtkMyModuleWin32Header.h file following the pattern set by other Modules.
- add your module SUBDIR to the CMakeLists.txt file in the Slicer3/Modules directory above.
- to add your module to Slicer3, create a new instance of vtkSlicerMyModuleLogic and vtkSlicerMyModuleGUI in Slicer3/Applications/GUI/Slicer3.cxx, and follow the pattern used by other modules, like the GradientAnisotropicDiffusionFilter module.
- include relevant .h files in Slicer3/Applications/GUI/Slicer3.cxx, and
- specify your module's source and binary Include directories in Slicer3/Application/GUI/CMakeLists.txt
- and include your module in the CMakeLists.txt target link libraries
Add a module-switch in CMake
You can add an automatic on/off switch to the ccmake configuration GUI, which will make compilation and development for the user easier. To do this add the following to two CMakeLists.txt und the Slicer3.cxx files:
- add the following lines to your Slicer3/Module/MyModule/CMakeLists.txt
PROJECT(MyModule)

OPTION(MYMODULE "Do you want to build the MyModule?")
IF(MYMODULE)
... (Rest of the file)
ENDIF(MYMODULE)
- after this you have MYMODULE as a variable which says if your module is build or not
- but we want also to exclude the module library and our source in the Slicer3.cxx file if the module is not build
- in /Slicer3/Applications/GUI/CMakeLists.txt add the following directly above TARGET_LINK_LIBRARIES(...
IF(MYMODULE)
 SET(MYMODULE_LINK_LIB MyModule)
ELSE(MYMODULE)
 ADD_DEFINITIONS(-DMYMODULE_DEBUG)
ENDIF(MYMODULE)
- then add to the TARGET_LINK_LIBRARIES(...${MYMODULE_LINK_LIB}) instead of your previous entry
- the ADD_DEFINITIONS declaration adds a preprocessor symbol to the compile which we use to exclude our code from the /Slicer3/Applications/GUI/Slicer3.cxx
- just border your code in /Slicer3/Applications/GUI/Slicer3.cxx with the following:
#ifndef MYMODULE_DEBUG
...(your code/includes)
#endif
Miscellaneous
Helpful tips:
- Make the vtkModuleCollapsibleFrames which contain the major logical sections of your module members of your module GUI class and expose them through your API. Doing so helps other developers, who may want to offer a jump to your module's functionality, to programmatically raise your UIpanel and expand the frame they're interested in. This paradigm will help to promote fluid navigation of slicer's interface and the reuse of existing functionality.

