Difference between revisions of "Projects:RegistrationDocumentation:Anonymization"
From NAMIC Wiki
| Line 18: | Line 18: | ||
:*From the ''File'' menu, select ''Save'' | :*From the ''File'' menu, select ''Save'' | ||
:*click on the second button from the right to select all images for saving, or check all the boxes in the ''Select'' column | :*click on the second button from the right to select all images for saving, or check all the boxes in the ''Select'' column | ||
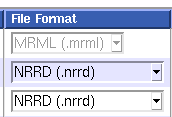
| − | [[Image:3DSlicer_NRRDformat.png|Select NRRD as output file | + | [[Image:3DSlicer_NRRDformat.png|Select NRRD as output file format]] |
*if not already selected as default, choose '''NRRD (.nrrd)''' from the pulldown menu in the file format column | *if not already selected as default, choose '''NRRD (.nrrd)''' from the pulldown menu in the file format column | ||
*select a new output directory by clicking on the icon next to ''Change Destination for All Selected'''. | *select a new output directory by clicking on the icon next to ''Change Destination for All Selected'''. | ||
Revision as of 15:00, 22 April 2010
Home < Projects:RegistrationDocumentation:Anonymization- all shared data-sets must be anonymized before we can post them.
- Sharing anonymized data in most cases is IRB exempt based on Code of Federal Regulations 45 CFR 46.101(b), which lists as exemption category 4:
 Unless otherwise required by department or agency heads, [...] the following categories are exempt [...]:

 4.Research involving the collection or study of existing data, documents, records , pathological specimens,
 or diagnostic specimens, if these sources are publicly available or if the information is recorded by the
 investigator in  such a manner that subjects cannot be identified, directly or through identifiers linked
 to the subjects.
1. Load Your Image Data into 3DSlicer
- if you have not yet done so, download a recent version of 3DSlicer: 3DSlicer Download
- load all images (fixed/reference and moving) into slicer. For a tutorial see the 3 Minute Slicer Intro Tutorial
2. View and Verify
- make sure data is complete (all the slices, fixed reference image and all moving images that are to be aligned
3. Save as NRRD
- From the File menu, select Save
- click on the second button from the right to select all images for saving, or check all the boxes in the Select column
- if not already selected as default, choose NRRD (.nrrd) from the pulldown menu in the file format column
- select a new output directory by clicking on the icon next to Change Destination for All Selected'.
- click on Save Selected
Notes
- if you are unsucessful in anonymizing the data as described above, let us know and we'll walk you through it.
- for some high-resolution structural head MRI we may have apply additional "defacing" (i.e. masking of image parts of the face and/or ears) before posting. This removal applies only to image content of facial features that might be recognizable as a 3D rendering. We will do this for you. Only the defaced data is kept.
