OpenIGTLink/Slicer
Contents
Introduction
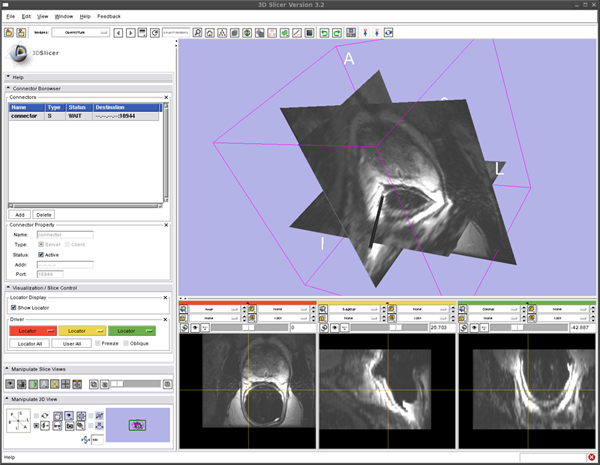
The OpenIGTLink module is a communication interface between 3D Slicer and Open-IGT-Link-compliant devices. It enables the 3D SLicer to import various types of data such as real-time images, tracking data and other user-defined commands and data. The module supports multiple device connections. Each of connections can be configured as either server mode (the Slicer waits connections from devices) or client mode (the Slicer request connection to clients) independently.
The module works with MRML to exchange coordinate and image data with other clinical modules e.g. NeuroNav and ProstateNav in the Slicer. The module has a dedicated graphical user interface to manage and control multiple connections.
Install the Software
From binaries
The Open IGT Link is currently distributed as a loadable module for 3D Slicer. You need to obtain 3D Slicer and Module object.
3D Slicer (Version 3.2 release)
- For Windows (32-bit)
- For Linux (x86, 32-bit)
- For Linux (x86, 64-bit)
- For Mac OS X (x86)
- For Mac OS X (PPC)
Open IGT Link Loadable Module (for Version 3.2)
- For Linux (x86, 32-bit).
- For Linux (x86, 64-bit).
- For Windows (32-bit).
- For Mac OS X(x86).
- For Mac OS X(PPC).
Install
- Copy the binary into your-slicer3-build(install)-directory/lib/Slicer3/Modules.
- You should see OpenIGTLink in the Slicer3 module list after Slicer is started.
Build from source
Build 3D Slicer
Please refer instruction in [1].
Build Open IGT Link Loadable Module
Before build the module, please make sure that your CMake's version is higher than 2.6. You can find it in Slicer3-lib/CMake-build directory, which was created during building 3D Slicer.
First, get the source code from the repository. For Linux and Mac:
 $ cd <working directory>
 $ svn co http://svn.na-mic.org/NAMICSandBox/trunk/IGTLoadableModules/OpenIGTLink OpenIGTLink
Create build direcotry
 $ mkdir OpenIGTLink-build
 $ cd OpenIGTLink-build
Then configure by using CMake
 $ cmake -DSlicer3_DIR=<Path to Slicer-build directory> ../OpenIGTLink
NOTE: <Path to Slicer-build directory> should be a full-path.
If the previous command has completed without error, you can start compiling
$ make
After the compilation, you will find libOpenIGTLink.so (Linux) libOpenIGTLink.dylib (Mac) in OpenIGTLink-build dirctory.
!! Note: Building on Mac OS X 10.5 (Leopard) !!
If you are working in the Mac OS X 10.5 (Leopard) environment, you may get a linker error:
ld: cycle in dylib re-exports with /usr/X11R6/lib/libGL.dylib
This is caused by a known bug of the Open GL library in Mac OS X 10.5 (see [2] for detail). To avoid this error, specify following option when you run cmake.
$ cmake -DSlicer3_DIR=<Path to Slicer-build directory> -DCMAKE_SHARED_LINKER_FLAGS=-Wl,-dylib_file,/System/Library/Frameworks/OpenGL.framework/Versions/A/Libraries/libGL.dylib:/System/Library/Frameworks/OpenGL.framework/Versions/A/Libraries/libGL.dylib ../OpenIGTLink
Tracker Simulator for Testing
To test the Open IGT Link module (or other Open-IGT-Link-complaint devices and software), tracking simulator software is provided. This software simply sends dummy coordinate data to the server with specified frame rate. You can either obtain the software as a binary code or build from source.
From binaries
Obtain a binary file for your environment.
- For Linux (x86, 32-bit).
- For Linux (x86, 64-bit).
- For Windows (32-bit).
- For Mac OS X (x86).
- For Mac OS X (PPC).
From Source
To get the source code, run following commands:
$ mkdir <working directory>
$ svn co http://www.na-mic.org/svn/NAMICSandBox/trunk/BRPTools/ScannerIO ScannerIO
Then configure the source code
$ cd ScannerIO
$ ccmake .
Usually, you don't need to change any setting. Just press 'c' key by 'g' key to generate Makefiles. Press 'q' to quit the ccmake interface. Now you are ready to build the program.
$ make
The executable file TrackerSim can be found in ScannerIO/bin directory.
Testing Open IGT Link Module -- Show Tracking Device in the 3D Space
Set up Open IGT Link Module
- Select "OpenIGTLink" from "Modules:" menu
- Open "Connector Browser" frame, and press "Add" button below the "Connectors" list to add a new connector
- Configure and start the connector. Choose "Server" check box in the "Type" option, then clinck "Active" check box. Now the Slicer is ready to accept connections through Open IGT Link.
Run Tracker Simulator
To send dummy coordinate data to the Slicer running on localhost with frame rate of 10 fps, run:
$ ./TrackerSim 10 c localhost 18944
Visualize Tracker Position
To see the coordinate from the Tracker Simulator,
- Open "Visualization / Slice Control" frame in the OpenIGTLink module interface.
- Click the "Show Locator" check button. A locator model shows up on the 3D viewer.
- Open "Data" module. Choose "Data" from "Modules:" menu.
- Edit MRML tree. Put "IGTLocator" under the "Tracker" by dragging "IGTLocator" node.
- You should see the locator model moves in the 3D viewer.
Testing Open IGT Link Module -- Reslice 3D image
We can reslice 3D image according to the locator position with following steps:
- Load 3D volume from the "Volumes" module.
- Start Tracking as we did in the previous section.
- In the "Visualization / Slice Control" frame in the OpenIGTLink module interface, click Red menu and choose "Locator".
- The image in the left 2D slice viewer (Red) should start to move. You can change the orientation by changing slice orientation menu in the 2D slice viewer.
- If you click the "Oblique" check button in the "Visualization / Slicer Control" frame, the slice orientation is set according to the locator orientation.
- You can use other 2D viewers (Yellow and Green) by choosing "Locator" from the Yellow and Green menu in the "Visualization / Slice Control" frame.
