Difference between revisions of "Projects:RegistrationLibrary:RegLib C40"
m (Text replacement - "http://www.slicer.org/slicerWiki/index.php/" to "https://www.slicer.org/wiki/") |
|||
| (9 intermediate revisions by one other user not shown) | |||
| Line 6: | Line 6: | ||
=== Input === | === Input === | ||
{| style="color:#bbbbbb; " cellpadding="10" cellspacing="0" border="0" | {| style="color:#bbbbbb; " cellpadding="10" cellspacing="0" border="0" | ||
| − | |[[Image: | + | |[[Image:RegLib_C40_Thumb1.png|150px|lleft|sample 1]] |
|[[Image:RegArrow_NonRigid.png|100px|lleft]] | |[[Image:RegArrow_NonRigid.png|100px|lleft]] | ||
| − | |[[Image: | + | |[[Image:RegLib_C40_Thumb2.png|150px|lleft|sample 2]] |
|- | |- | ||
|fixed image 1/target<br>microCT sample 1 | |fixed image 1/target<br>microCT sample 1 | ||
| Line 18: | Line 18: | ||
=== Modules === | === Modules === | ||
'''Slicer 3.6.1''' recommended modules: | '''Slicer 3.6.1''' recommended modules: | ||
| − | *[ | + | *[https://www.slicer.org/wiki/Modules:BRAINSFit BrainsFit] |
| − | *[ | + | *[https://www.slicer.org/wiki/Modules:ResampleVolume-Documentation-3.6 Resampling Module] |
===Objective / Background === | ===Objective / Background === | ||
| − | We seek a low-DOF nonrigid registration to assess structural changes in the microstructure of the test sample. | + | We seek a low-DOF nonrigid registration to assess structural changes in the microstructure of the test sample. In particular the goal is to characterize the hygromechanical behavior of wood under specific environmental conditions. |
=== Keywords === | === Keywords === | ||
micro CT, serial imaging, change assessment | micro CT, serial imaging, change assessment | ||
| Line 33: | Line 33: | ||
*subsampled reference/fixed : micro CT , 1.41x1.41x1 mm voxel size, 256x256x200 | *subsampled reference/fixed : micro CT , 1.41x1.41x1 mm voxel size, 256x256x200 | ||
*subsampled moving : micro CT , 1.41x1.41x1 mm voxel size, 256x256x200 | *subsampled moving : micro CT , 1.41x1.41x1 mm voxel size, 256x256x200 | ||
| + | |||
| + | ===Download === | ||
| + | *Data | ||
| + | **[[Media:RegLib_C40_Data.zip |'''RegLib_C40_Data''' , image data, resets & solution transforms <small> (NRRD files, zip file 55 MB) </small>]]''' | ||
| + | *Presets | ||
| + | **[[Media:RegLib_C40_Presets.mrml|'''RegLib_C40_Presets''' Presets for BRAINSFIT registration <small> (.mrml file 16 kB) </small>]]''' | ||
| + | **[[Projects:RegistrationDocumentation:ParameterPresetsTutorial|Link to User Guide: How to Load/Save Registration Parameter Presets]] | ||
=== Overall Strategy === | === Overall Strategy === | ||
| Line 40: | Line 47: | ||
=== Procedures === | === Procedures === | ||
*'''Phase 0: Subsample to reduce memory usage (not included in example dataset)''' | *'''Phase 0: Subsample to reduce memory usage (not included in example dataset)''' | ||
| − | + | ::The original images are 350MB each and not included in the example set, since for the purpose of registration the subsampled smaller versions are equivalent. We subsample to the sizes below: | |
| + | #Load original images | ||
| + | #Go to [https://www.slicer.org/wiki/Modules:Volumes-Documentation-3.6 ''Volumes''] module | ||
| + | ##select ''Info'' tab and record the voxel size and overall dimensions. For this case we have 0.35x0.35x1 mm voxel size and an 1024x1024x200 voxel volume. To reduce this to 256x256 in plane resolution we will increase the voxel size to , 1.4x1.4x1 mm | ||
| + | #go to [https://www.slicer.org/wiki/Modules:ResampleVolume-Documentation-3.6 ''Resample Scalar Volume''] module | ||
| + | ##for ''Spacing'' enter 1.41112,1.41112,1 (4 times the original inplane voxel size; through plane we leave unchanged.) | ||
| + | ##for Interpolation leave linear (default). | ||
| + | ##''Input volume'': select original image volume (e/g/ 20a_wood) , ''Output Volume'': select "create new" , then select "Rename" and rename to "20a_wood_sub2" or similar | ||
| + | ##Click ''Apply'' | ||
| + | ##Go back to the [https://www.slicer.org/wiki/Modules:Data-Documentation-3.6 ''Data''] module. | ||
| + | ##you can now delete the original 350MB volume: right click on the node in the tree and select ''Delete Node'' | ||
*'''Phase I: Register Rigid/Affine''' | *'''Phase I: Register Rigid/Affine''' | ||
| − | #open | + | #open [https://www.slicer.org/wiki/Modules:BRAINSFit ''BrainsFit''] module |
| + | #set the parameters below or, if loaded, use presets (''Parameter Set''): BRAINSfit1_Affine | ||
##Fixed: "88a_sub2", Moving: "20a_sub2" | ##Fixed: "88a_sub2", Moving: "20a_sub2" | ||
##Registration Phases: | ##Registration Phases: | ||
| Line 53: | Line 71: | ||
##Click ''Apply''. Registration should take <1 min. | ##Click ''Apply''. Registration should take <1 min. | ||
##Note: we're not selecting a resampled volume at this point, because the affine transform is only an intermediate step. It is recommended for the first time to do the affine and nonrigid portions separately, so that potential failure of the affine portion can be recognized. If you're confident about the affine step, you can combine both Phase I & II here into a single step. In that case choose the output selections from phase II below. | ##Note: we're not selecting a resampled volume at this point, because the affine transform is only an intermediate step. It is recommended for the first time to do the affine and nonrigid portions separately, so that potential failure of the affine portion can be recognized. If you're confident about the affine step, you can combine both Phase I & II here into a single step. In that case choose the output selections from phase II below. | ||
| + | #When complete, the algorithm will automatically place the moving volume inside the newly created transformation node. To see this go to the [https://www.slicer.org/wiki/Modules:Data-Documentation-3.6 ''Data''] module. | ||
| + | #set to link the 3 slice views | ||
| + | #Set the fixed image (88a) as background and the moving image (20a) as foreground. | ||
| + | #use the fade slider to pan between the two images and evaluate the registration quality. To see the original unregistered position, drag the moving image (20a) back out of the transform node (drag on top of "scene" node. | ||
*'''Phase III: Register norigid BSpline''' | *'''Phase III: Register norigid BSpline''' | ||
| + | #open [https://www.slicer.org/wiki/Modules:BRAINSFit ''BrainsFit''] module | ||
#open Registration : ''BrainsFit'' module (presets: BRAINSfit3_BSpline_9x9x9 | #open Registration : ''BrainsFit'' module (presets: BRAINSfit3_BSpline_9x9x9 | ||
##Input Parameters: same as above:Fixed: "88a_sub2", Moving: "20a_sub2" | ##Input Parameters: same as above:Fixed: "88a_sub2", Moving: "20a_sub2" | ||
| Line 68: | Line 91: | ||
##Leave all other settings at default | ##Leave all other settings at default | ||
##Click ''Apply''. Registration should take ~2 min. Note: main optimizer is parallelized; i.e. multi-core CPU systems will benefit greatly in speed. | ##Click ''Apply''. Registration should take ~2 min. Note: main optimizer is parallelized; i.e. multi-core CPU systems will benefit greatly in speed. | ||
| + | *'''Phase IV: (optional not included in example dataset) Resample Original (full size) images'' | ||
| + | #load the full resolution image | ||
| + | #go to the [https://www.slicer.org/wiki/Modules:ResampleScalarVectorDWIVolume-Documentation-3.6 ''ResampleScalarVectorDWIVolume''] module | ||
| + | ##''Input Volume'': select original full size image (20a_wood) | ||
| + | ##''Reference Volume": select original full size reference (88a_wood) | ||
| + | ##''Output Volume'': select "Create New Volume" , then "Rename" to "20a_wood_Xf3" or similar | ||
| + | ##''Transform Parameters'' under ''Transform Node'' select the above final BSpline transform "Xf2_BSpline_9x9x9" | ||
| + | ##''Transforms Order'': make sure that '''output-to-input''' is checked and ''Bulk Transform'' is off | ||
| + | ##Select desired interpolation type (linear or ws) | ||
| + | ##Click Apply | ||
| + | #Save result | ||
=== Registration Results=== | === Registration Results=== | ||
| + | click on images for full size | ||
{| style="color:#bbbbbb; background-color:#333333;" cellpadding="10" cellspacing="0" border="0" | {| style="color:#bbbbbb; background-color:#333333;" cellpadding="10" cellspacing="0" border="0" | ||
| − | |[[Image:RegLib_C40_unreg. | + | |[[Image:RegLib_C40_unreg.gif|400px|center|unregistered]] |
|original unregistered | |original unregistered | ||
|- | |- | ||
| Line 81: | Line 116: | ||
|} | |} | ||
| − | === | + | ===Acknowledgments === |
| − | + | Registration problem and dataset kindly provided by Alessandra Patera from the [http://www.ethz.ch/index_EN Swiss Federal Institute of Technology (ETHZ)] in collaboration with the [http://www.empa.ch/ Swiss Federal Laboratories for Material Science and Technology (EMPA)]. | |
| − | |||
| − | |||
| − | |||
| − | |||
| − | |||
<!-- | <!-- | ||
comment | comment | ||
--> | --> | ||
Latest revision as of 17:13, 10 July 2017
Home < Projects:RegistrationLibrary:RegLib C40Back to ARRA main page
Back to Registration main page
Back to Registration Use-case Inventory
Contents
v3.6.3  Slicer Registration Library Case #40: micro CT of structural changes in wood
Input

|

|

|
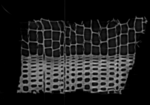
| fixed image 1/target microCT sample 1 |
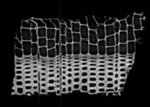
moving image microCT sample 2 |
Modules
Slicer 3.6.1 recommended modules:
Objective / Background
We seek a low-DOF nonrigid registration to assess structural changes in the microstructure of the test sample. In particular the goal is to characterize the hygromechanical behavior of wood under specific environmental conditions.
Keywords
micro CT, serial imaging, change assessment
Input Data
- reference/fixed : micro CT , 0.35x0.35x1 mm voxel size, 1024x1024x200
- moving : micro CT , 0.35x0.35x1 mm voxel size, 1024x1024x200
Note: The original images are 350MB each and not included in the example set, since for the purpose of registration the subsampled smaller versions are equivalent. We subsample to the sizes below:
- subsampled reference/fixed : micro CT , 1.41x1.41x1 mm voxel size, 256x256x200
- subsampled moving : micro CT , 1.41x1.41x1 mm voxel size, 256x256x200
Download
- Data
- Presets
Overall Strategy
- run rigid/affine registration (BRAINSfit)
- run 9x9x9 nonrigid registration (BRAINSfit BSpline) using the above affine as input
Procedures
- Phase 0: Subsample to reduce memory usage (not included in example dataset)
- The original images are 350MB each and not included in the example set, since for the purpose of registration the subsampled smaller versions are equivalent. We subsample to the sizes below:
- Load original images
- Go to Volumes module
- select Info tab and record the voxel size and overall dimensions. For this case we have 0.35x0.35x1 mm voxel size and an 1024x1024x200 voxel volume. To reduce this to 256x256 in plane resolution we will increase the voxel size to , 1.4x1.4x1 mm
- go to Resample Scalar Volume module
- for Spacing enter 1.41112,1.41112,1 (4 times the original inplane voxel size; through plane we leave unchanged.)
- for Interpolation leave linear (default).
- Input volume: select original image volume (e/g/ 20a_wood) , Output Volume: select "create new" , then select "Rename" and rename to "20a_wood_sub2" or similar
- Click Apply
- Go back to the Data module.
- you can now delete the original 350MB volume: right click on the node in the tree and select Delete Node
- Phase I: Register Rigid/Affine
- open BrainsFit module
- set the parameters below or, if loaded, use presets (Parameter Set): BRAINSfit1_Affine
- Fixed: "88a_sub2", Moving: "20a_sub2"
- Registration Phases:
- initialize: "Off" (default) (note: you may have to expand the control tab to see the full line of options. Click and drag on the vertical separation bar between the control field and the views, to the right of the scrollbar
- select/check: "Include Rigid" Include Scale Versor 3D Include Affine" registration phase
- Output Settings
- Slicer Linear Transform: select "Create New Linear Transform", then select "Rename" and change name to "Xf1_Affine" or similar
- Registration Parameters: increase Number Of Samples to 200,000
- Leave all other settings at default
- Click Apply. Registration should take <1 min.
- Note: we're not selecting a resampled volume at this point, because the affine transform is only an intermediate step. It is recommended for the first time to do the affine and nonrigid portions separately, so that potential failure of the affine portion can be recognized. If you're confident about the affine step, you can combine both Phase I & II here into a single step. In that case choose the output selections from phase II below.
- When complete, the algorithm will automatically place the moving volume inside the newly created transformation node. To see this go to the Data module.
- set to link the 3 slice views
- Set the fixed image (88a) as background and the moving image (20a) as foreground.
- use the fade slider to pan between the two images and evaluate the registration quality. To see the original unregistered position, drag the moving image (20a) back out of the transform node (drag on top of "scene" node.
- Phase III: Register norigid BSpline
- open BrainsFit module
- open Registration : BrainsFit module (presets: BRAINSfit3_BSpline_9x9x9
- Input Parameters: same as above:Fixed: "88a_sub2", Moving: "20a_sub2"
- Registration Phases:
- Initialize with previously generated transform : select "Xf1_Affine" generated above
- uncheck "Rigid", "ScaleVersor" and Affine, check: "Include BSpline registration phase"
- Output Settings
- set Slicer Linear Transform to "None"
- for Slicer BSpline Transform select "Create New Linear Transform", then select "Rename" and change name to "Xf2_BSpline" or similar
- for Output Image Volume select "Create New Volume", then select "Rename" and change name to "20a_sub2_Xf2" or similar to indicate that this volume is resampled with the above transform (Xf2_BSpline)
- change Output Pixel Type to match input data type, in this case "ushort"
- Registration Parameters: increase Number Of Samples to 200,000
- Registration Parameters: set Number Of Grid Subdivisions to 7x7x7
- Leave all other settings at default
- Click Apply. Registration should take ~2 min. Note: main optimizer is parallelized; i.e. multi-core CPU systems will benefit greatly in speed.
- 'Phase IV: (optional not included in example dataset) Resample Original (full size) images
- load the full resolution image
- go to the ResampleScalarVectorDWIVolume module
- Input Volume: select original full size image (20a_wood)
- Reference Volume": select original full size reference (88a_wood)
- Output Volume: select "Create New Volume" , then "Rename" to "20a_wood_Xf3" or similar
- Transform Parameters under Transform Node select the above final BSpline transform "Xf2_BSpline_9x9x9"
- Transforms Order: make sure that output-to-input is checked and Bulk Transform is off
- Select desired interpolation type (linear or ws)
- Click Apply
- Save result
Registration Results
click on images for full size
| original unregistered | |
| after affine registration | after affine + 9x9x9 BSpline registration |
Acknowledgments
Registration problem and dataset kindly provided by Alessandra Patera from the Swiss Federal Institute of Technology (ETHZ) in collaboration with the Swiss Federal Laboratories for Material Science and Technology (EMPA).


