Difference between revisions of "Image Registration for MRg Prostate Biopsy"
m (Text replacement - "http://www.slicer.org/slicerWiki/index.php/" to "https://www.slicer.org/wiki/") |
|||
| Line 8: | Line 8: | ||
{|style="text-align:left;" border="0" | {|style="text-align:left;" border="0" | ||
| | | | ||
| − | You must compile 3D Slicer version 3 from source. General build instructions and prerequisites can be found here: | + | You must compile 3D Slicer version 3 from source. General build instructions and prerequisites can be found here: https://www.slicer.org/wiki/Slicer3:Build_Instructions. You should also enable BRAINSFitIGT module in the CMake options, as shown in the screnshot. |
|[[Image:BRAINSFitIGT_build_option.png]] | |[[Image:BRAINSFitIGT_build_option.png]] | ||
| Line 20: | Line 20: | ||
Before registering pre-procedural prostate T2w MRI, the following workflow is advised: | Before registering pre-procedural prostate T2w MRI, the following workflow is advised: | ||
# prepare approximate contouring of the prostate gland in the pre-procedural T2w image | # prepare approximate contouring of the prostate gland in the pre-procedural T2w image | ||
| − | # apply N4 inhomogeneity correction (using [ | + | # apply N4 inhomogeneity correction (using [https://www.slicer.org/wiki/Modules:N4ITKBiasFieldCorrection-Documentation-3.6 this module of Slicer]) to the pre-procedural image, in case it was acquired using endorectal coil. While performing inhomogeneity correction, use the prostate mask prepared in the previous step. The recommended number of iterations is "500,400,300". |
Next, proceed with the registration steps as described below. | Next, proceed with the registration steps as described below. | ||
Latest revision as of 17:20, 10 July 2017
Home < Image Registration for MRg Prostate BiopsySummary
BRAINSFitIGT code is a 3D Slicer module based on the BRAINSFit code originally developed by Hans Johnson and his team at U.Iowa. BRAINSFitIGT has been modified and customized to support registration of prostate preoperative MRI to intraoperative MRI during MR-guided biopsy procedures. This module is NOT included in the binary distribution of 3D Slicer: you need to compile Slicer version 3 from source code to access it. This page explains how to compile and use this module.
BRAINSFitIGT module has been developed specifically to register pre-procedural T2w MRI that are typically using endorectal coil to intra-procedural MRI that do not use endorectal coil.
Build instructions
|
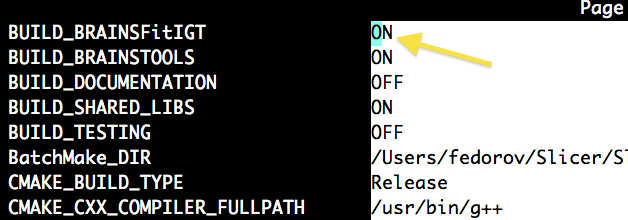
You must compile 3D Slicer version 3 from source. General build instructions and prerequisites can be found here: https://www.slicer.org/wiki/Slicer3:Build_Instructions. You should also enable BRAINSFitIGT module in the CMake options, as shown in the screnshot. |

|
Usage instructions
You are supposed to be familiar with 3D Slicer. If this is not the case, familiarize yourself at least with the tutorials 1, 2, 4 and 5 from Slicer 3.6 training page.
Before registering pre-procedural prostate T2w MRI, the following workflow is advised:
- prepare approximate contouring of the prostate gland in the pre-procedural T2w image
- apply N4 inhomogeneity correction (using this module of Slicer) to the pre-procedural image, in case it was acquired using endorectal coil. While performing inhomogeneity correction, use the prostate mask prepared in the previous step. The recommended number of iterations is "500,400,300".
Next, proceed with the registration steps as described below.
|
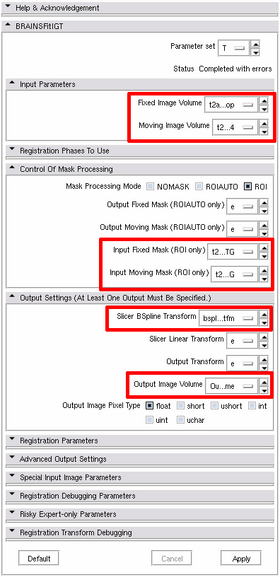
1. Preparation step: start Slicer, load the images (let's say, they are called "preop.nrrd" and "intraop.nrrd"). Do the following:
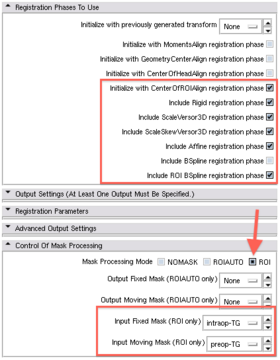
2. Registration step
|
References
- Fedorov A, Tuncali K, Fennessy FM, Hata N, Wells WM, Kikinis R, Tempany CM, Tokuda J, Hata N, Wells WM, et al. Image registration for targeted MRI-guided transperineal prostate biopsy. Journal of Magnetic Resonance Imaging. 2012 May 2009 http://www.ncbi.nlm.nih.gov/pubmed/22645031

