Difference between revisions of "Projects:RegistrationLibrary:RegLib C01"
From NAMIC Wiki
m (Text replacement - "http://www.slicer.org/slicerWiki/index.php/" to "https://www.slicer.org/wiki/") |
|||
| (87 intermediate revisions by 2 users not shown) | |||
| Line 1: | Line 1: | ||
[[Projects:ARRASuplements|Back to ARRA main page]] <br> | [[Projects:ARRASuplements|Back to ARRA main page]] <br> | ||
[[Projects:RegistrationDocumentation|Back to Registration main page]] <br> | [[Projects:RegistrationDocumentation|Back to Registration main page]] <br> | ||
| − | [[Projects:RegistrationDocumentation:UseCaseInventory|Back to Registration | + | [[Projects:RegistrationDocumentation:UseCaseInventory|Back to Registration Case Library]] <br> |
| − | ==Slicer Registration | + | ==<small>updated for '''v4.1'''</small> [[Image:Slicer4_RegLibLogo.png|150px]] Slicer Registration Library Case #01: <br>Intra-subject Brain MRI: axial T1 Tumor Growth Assessment== |
| − | {| style="color:#bbbbbb | + | === Input === |
| − | |[[Image:RegUC2_thumb_t0.png| | + | {| style="color:#bbbbbb; " cellpadding="10" cellspacing="0" border="0" |
| − | |[[Image: | + | |[[Image:RegUC2_thumb_t0.png|200px|lleft|this is the fixed reference image. All images are aligned into this space]] |
| − | |[[Image:RegUC2_thumb_t1.png| | + | |[[Image:RegArrow_Affine.png|100px|lleft]] |
| − | + | |[[Image:RegUC2_thumb_t1.png|200px|lleft|this is the moving image. The transform is calculated by matching this to the reference image]] | |
| − | |||
| − | |||
| − | |||
| − | |||
| − | |||
| − | |||
|- | |- | ||
| − | | | + | |fixed image/target |
| | | | ||
| − | | | + | |moving image |
|} | |} | ||
| + | |||
| + | === Versions === | ||
| + | <big>[[Projects:RegistrationLibrary:RegLib_C01b|'''For the Slicer 3.6 version of this tutorial see here''']]</big> | ||
| + | |||
| + | |||
| + | === Slicer 4.1 recommended Modules === | ||
| + | *[https://www.slicer.org/wiki/Documentation/4.1/Modules/BRAINSFit BrainsFit] | ||
| + | *[http://wiki.slicer.org/slicerWiki/index.php/Documentation/4.1/Modules/AffineRegistration Affine Registration] | ||
| + | *[http://wiki.slicer.org/slicerWiki/index.php/Documentation/4.1/Modules/ExpertAutomatedRegistration Expert Automated Registration] | ||
| + | |||
===Objective / Background === | ===Objective / Background === | ||
| − | This | + | This is a typical case of change assessment. We want to know if/how the tumor changed since last exam. |
=== Keywords === | === Keywords === | ||
| − | MRI, brain, head, intra-subject | + | MRI, brain, head, intra-subject, T1, tumor growth, meningioma, change assessment |
===Input Data=== | ===Input Data=== | ||
| − | * | + | *reference/fixed : T1 SPGR , 0.9375 x 0.9375 x 1.4 mm voxel size, axial, RAS orientation. |
| − | * | + | *moving: T1 SPGR , 0.9375 x 0.9375 x 1.2 mm voxel size, sagittal, RAS orientation. |
| − | |||
| − | |||
| − | |||
| − | == | + | == Procedure using ''General (BRAINS) Registration == |
| − | * | + | *there is a brief movie in the download section that shows this procedure step by step |
| − | + | #open the [http://wiki.slicer.org/slicerWiki/index.php/Documentation/4.1/Modules/BRAINSFit General Registration (BRAINS) module] | |
| − | + | ##''Fixed Image Volume'': MRMeningioma_1 | |
| − | + | ##''Moving Image Volume'': MRMeningioma_2 | |
| − | + | ##Output Settings: | |
| + | ###''Slicer BSpline Transform": none | ||
| + | ###''Slicer Linear Transform'': create new transform, rename to "MRMeningioma_2_Xf1" | ||
| + | ###''Output Image Volume'': create new volume, rename to "MRI_Xf1" (we use this for ease of validation only) | ||
| + | ##''Registration Phases'': check boxes for ''Rigid'' and ''Affine'' | ||
| + | ##''Main Parameters'' | ||
| + | ###'''Number of Samples''': 200,000 | ||
| + | ##click: Apply; runtime < 1 min (MacPro QuadCore 2.4GHz) | ||
| + | #this will generate 1) the alignment transform , 2) a resampled volume | ||
| + | #note that the Slicer4.1 version of BRAINS registration does '''not''' automatically place the moving volume inside the result transform, as it did for Slicer 3.6. In order to see the result, you must either go to the [http://wiki.slicer.org/slicerWiki/index.php/Documentation/4.1/Modules/Data ''Data module''] and drag the moving volume inside the transform node, or select to generate a resampled ''Output Volume'', as done above. The demo movie you can download here shows how to do this. | ||
| − | == | + | == Procedure using the ''Affine Registration'' module == |
| − | *the | + | *there is a brief movie in the download section that shows this procedure step by step |
| − | + | #open the [http://wiki.slicer.org/slicerWiki/index.php/Documentation/4.1/Modules/AffineRegistration Affine Registration] module (under "All Modules" menu | |
| − | + | ##Registration Parameters tab: '''Spatial Samples''': 200,000 | |
| + | ##IO tab: | ||
| + | ###''Fixed Image'': MRMeningioma_1 , | ||
| + | ###''Moving Image'': MRMeningioma_2 | ||
| + | ###''Output Transform'': create new transform, rename to "Xf1_Affine2" | ||
| + | ##click: Apply; runtime < 10 sec (MacPro QuadCore 2.4GHz) | ||
| + | #this will generate an alignment transform. but no resampled volume. To see the result: | ||
| + | #go to the [http://wiki.slicer.org/slicerWiki/index.php/Documentation/4.1/Modules/Data ''Data module''] | ||
| + | ##drag the list entry "MRMeningioma_2" inside/onto the transform node "Xf1_Affine2" | ||
| + | ##place MRMeningioma_1 and MRMeningioma_2 into fore- and background, respectively | ||
| + | #use fade slider to shift between fore- and background to view the registration quality. | ||
| − | == | + | == Procedure using the ''Expert Automated Registration'' module == |
| − | + | #open the [http://wiki.slicer.org/slicerWiki/index.php/Documentation/4.1/Modules/ExpertAutomatedRegistration Expert Automated Registration] module (under "All Modules" menu | |
| − | + | ##IO tab: | |
| − | + | ###''Fixed Image'': MRMeningioma_1 , | |
| − | + | ###''Moving Image'': MRMeningioma_2 | |
| + | ###''Resample Image'': none (menu) | ||
| + | ##Registration Parameters tab: | ||
| + | ###''Save transform'': create new transform, rename to "Xf1_Affine3" | ||
| + | ###''Initialization'': None (radiobutton) | ||
| + | ###''Registration'': Affine (radiobutton) | ||
| + | ##''Advanced Affine Registration Parameters'' | ||
| + | ###This module lets you set the sampling rate for each registration phase individually, i.e. to set the amount of points used for an Affine registration, we change the sampling rate here. Also note that unlike the other two modules above, which specify sampling rate in absolute numbers, this is a percentage of the total image size. | ||
| + | ###we wish to use the same amount of points as for the other two methods, above: 200,000. To determine the equivalent sampling ratio we divide this number by the image dimensions, which we can find in the ''Volumes'' module as 256x256x120. This yields a sampling ratio of 0.2. | ||
| + | ##click: Apply; runtime < 10 sec (MacPro QuadCore 2.4GHz) | ||
| + | #this will generate an alignment transform. but no resampled volume. To see the result: | ||
| + | #go to the [http://wiki.slicer.org/slicerWiki/index.php/Documentation/4.1/Modules/Data ''Data module''] | ||
| + | ##drag the list entry "MRMeningioma_2" inside/onto the transform node "Xf1_Affine2" | ||
| + | ##place MRMeningioma_1 and MRMeningioma_2 into fore- and background, respectively | ||
| + | #use fade slider to shift between fore- and background to view the registration quality. | ||
=== Registration Results=== | === Registration Results=== | ||
| − | *[[Media: | + | {| style="color:#bbbbbb; background-color:#333333;" cellpadding="10" cellspacing="0" border="0" |
| − | * | + | |[[Image:RegLib_C01_unregistered.gif|300px|center|unregistered]] |
| − | * | + | |[[Image:RegLib_C01_AffineBRAINS.gif|300px|center|after affine alignment using the ''General (BRAINS) registration module'']] |
| + | |- | ||
| + | |unregistered | ||
| + | |after affine alignment using the ''General (BRAINS) registration module''] | ||
| + | |} | ||
| + | |||
| + | ===Download === | ||
| + | *Slicer 3.6.3 packages: | ||
| + | **'''[[Media:RegLib_C01_Data.zip|Image Data + solutions package <small> (NRRD images, SceneFile, Solution Xforms, zip file 11 MB) </small>]]''' | ||
| + | **'''[[Media:RegLib_C01_BRAINSreg.mov|ScreenCast video: ''General BRAINS registration <small> (Quicktime movie 3min, 20MB) </small>]]''' | ||
| + | **'''[[Media:RegLib_C01_AffineReg.mov|ScreenCast video: ''Affine registration <small> (Quicktime movie 1.5min, 10MB) </small>]]''' | ||
| + | **'''[[Media:RegLib_C01_ExpertAutoReg.mov|ScreenCast video: ''Expert Automated registration <small> (Quicktime movie 2min, 13MB) </small>]]''' | ||
| + | |||
| + | <!-- | ||
| + | comment | ||
| + | --> | ||
| + | |||
| + | === Discussion: Registration Challenges === | ||
| + | *accuracy is the critical criterion here. We need the registration error (residual misalignment) to be smaller than the change we want to measure/detect. Agreement on what constitutes good alignment can therefore vary greatly. | ||
| + | *the two images have strong differences in coil inhomogeneity. This affects less the registration quality but hampers evaluation. Most of the difference does not become apparent until after registration in direct juxtaposition. Bias field correction beforehand is recommended. | ||
| + | *we have slightly different voxel sizes | ||
| + | *if the pathology change is substantial it might affect the registration. | ||
| + | |||
| + | === Discussion: Key Strategies === | ||
| + | *the two images have identical contrast, hence we consider "sharper" cost functions, such as NormCorr or MeanSqrd | ||
| + | *general practice is to register the follow-up to the baseline. However here the follow-up has slightly higher resolution. From an image quality/data perspective it would be better to use the highest resolution image as your fixed/reference. But here follow the most common convention, i.e. fixed image is the baseline. | ||
| + | *if the pathology change is soo large that it might affect the registration, we should mask it out. The simplest way to do this is to build a box ROI from the ROItool and feed it as input to the registration. Remember that masking does not mean that masked areas aren't matched, they just do not contribute to the cost function driving the registration, but move along passively. Next more involved level would be to outline the tumor. If a segmentation is available, you can use that. | ||
| + | *these two images are not too far apart initially, so we reduce the default of expected translational misalignment | ||
Latest revision as of 17:42, 10 July 2017
Home < Projects:RegistrationLibrary:RegLib C01Back to ARRA main page
Back to Registration main page
Back to Registration Case Library
Contents
updated for v4.1  Slicer Registration Library Case #01:
Intra-subject Brain MRI: axial T1 Tumor Growth Assessment
Input
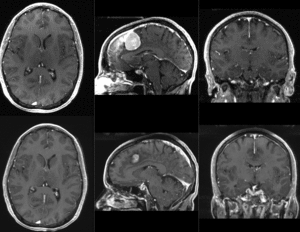
|
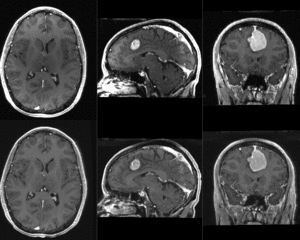
|
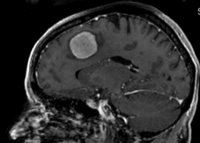
|
| fixed image/target | moving image |
Versions
For the Slicer 3.6 version of this tutorial see here
Slicer 4.1 recommended Modules
Objective / Background
This is a typical case of change assessment. We want to know if/how the tumor changed since last exam.
Keywords
MRI, brain, head, intra-subject, T1, tumor growth, meningioma, change assessment
Input Data
- reference/fixed : T1 SPGR , 0.9375 x 0.9375 x 1.4 mm voxel size, axial, RAS orientation.
- moving: T1 SPGR , 0.9375 x 0.9375 x 1.2 mm voxel size, sagittal, RAS orientation.
Procedure using General (BRAINS) Registration
- there is a brief movie in the download section that shows this procedure step by step
- open the General Registration (BRAINS) module
- Fixed Image Volume: MRMeningioma_1
- Moving Image Volume: MRMeningioma_2
- Output Settings:
- Slicer BSpline Transform": none
- Slicer Linear Transform: create new transform, rename to "MRMeningioma_2_Xf1"
- Output Image Volume: create new volume, rename to "MRI_Xf1" (we use this for ease of validation only)
- Registration Phases: check boxes for Rigid and Affine
- Main Parameters
- Number of Samples: 200,000
- click: Apply; runtime < 1 min (MacPro QuadCore 2.4GHz)
- this will generate 1) the alignment transform , 2) a resampled volume
- note that the Slicer4.1 version of BRAINS registration does not automatically place the moving volume inside the result transform, as it did for Slicer 3.6. In order to see the result, you must either go to the Data module and drag the moving volume inside the transform node, or select to generate a resampled Output Volume, as done above. The demo movie you can download here shows how to do this.
Procedure using the Affine Registration module
- there is a brief movie in the download section that shows this procedure step by step
- open the Affine Registration module (under "All Modules" menu
- Registration Parameters tab: Spatial Samples: 200,000
- IO tab:
- Fixed Image: MRMeningioma_1 ,
- Moving Image: MRMeningioma_2
- Output Transform: create new transform, rename to "Xf1_Affine2"
- click: Apply; runtime < 10 sec (MacPro QuadCore 2.4GHz)
- this will generate an alignment transform. but no resampled volume. To see the result:
- go to the Data module
- drag the list entry "MRMeningioma_2" inside/onto the transform node "Xf1_Affine2"
- place MRMeningioma_1 and MRMeningioma_2 into fore- and background, respectively
- use fade slider to shift between fore- and background to view the registration quality.
Procedure using the Expert Automated Registration module
- open the Expert Automated Registration module (under "All Modules" menu
- IO tab:
- Fixed Image: MRMeningioma_1 ,
- Moving Image: MRMeningioma_2
- Resample Image: none (menu)
- Registration Parameters tab:
- Save transform: create new transform, rename to "Xf1_Affine3"
- Initialization: None (radiobutton)
- Registration: Affine (radiobutton)
- Advanced Affine Registration Parameters
- This module lets you set the sampling rate for each registration phase individually, i.e. to set the amount of points used for an Affine registration, we change the sampling rate here. Also note that unlike the other two modules above, which specify sampling rate in absolute numbers, this is a percentage of the total image size.
- we wish to use the same amount of points as for the other two methods, above: 200,000. To determine the equivalent sampling ratio we divide this number by the image dimensions, which we can find in the Volumes module as 256x256x120. This yields a sampling ratio of 0.2.
- click: Apply; runtime < 10 sec (MacPro QuadCore 2.4GHz)
- IO tab:
- this will generate an alignment transform. but no resampled volume. To see the result:
- go to the Data module
- drag the list entry "MRMeningioma_2" inside/onto the transform node "Xf1_Affine2"
- place MRMeningioma_1 and MRMeningioma_2 into fore- and background, respectively
- use fade slider to shift between fore- and background to view the registration quality.
Registration Results
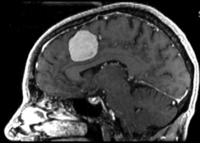
| unregistered | after affine alignment using the General (BRAINS) registration module] |
Download
- Slicer 3.6.3 packages:
- Image Data + solutions package (NRRD images, SceneFile, Solution Xforms, zip file 11 MB)
- ScreenCast video: General BRAINS registration (Quicktime movie 3min, 20MB)
- ScreenCast video: Affine registration (Quicktime movie 1.5min, 10MB)
- ScreenCast video: Expert Automated registration (Quicktime movie 2min, 13MB)
Discussion: Registration Challenges
- accuracy is the critical criterion here. We need the registration error (residual misalignment) to be smaller than the change we want to measure/detect. Agreement on what constitutes good alignment can therefore vary greatly.
- the two images have strong differences in coil inhomogeneity. This affects less the registration quality but hampers evaluation. Most of the difference does not become apparent until after registration in direct juxtaposition. Bias field correction beforehand is recommended.
- we have slightly different voxel sizes
- if the pathology change is substantial it might affect the registration.
Discussion: Key Strategies
- the two images have identical contrast, hence we consider "sharper" cost functions, such as NormCorr or MeanSqrd
- general practice is to register the follow-up to the baseline. However here the follow-up has slightly higher resolution. From an image quality/data perspective it would be better to use the highest resolution image as your fixed/reference. But here follow the most common convention, i.e. fixed image is the baseline.
- if the pathology change is soo large that it might affect the registration, we should mask it out. The simplest way to do this is to build a box ROI from the ROItool and feed it as input to the registration. Remember that masking does not mean that masked areas aren't matched, they just do not contribute to the cost function driving the registration, but move along passively. Next more involved level would be to outline the tumor. If a segmentation is available, you can use that.
- these two images are not too far apart initially, so we reduce the default of expected translational misalignment
