Projects:RegistrationLibrary:RegLib C12
From NAMIC Wiki
Home < Projects:RegistrationLibrary:RegLib C12
v3.6.3
Back to ARRA main page
Back to Registration main page
Back to Registration Use-case Inventory
Contents
v3.6.3  Slicer Registration Library Case #12: Liver Tumor Cryoablation
Input
|
|
|

|
|
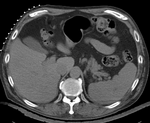
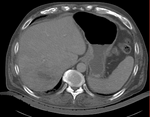
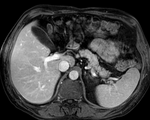
| fixed image/target | intermediate ref. image | moving image |
Modules
- Slicer 3.6.3 recommended modules: BrainsFit
Objective / Background
We seek to align a pre-operative MRI with the intra-operative CT for surgical guidance.
Keywords
MRI, CT, IGT, intra-operative, liver, cryoablation, change detection, non-rigid registration
Input Data
- reference/fixed : pr-op CT, 0.95 x 0.95 x 5 mm voxel size
- moving: intra-op MRI, 0.78 x 0.78 x 2.5 mm axial,
Notes / Overall Strategy
- the intra-op CT is acquired with a clipped FOV (to minimize acquisition time & exposure). This causes difficulty for intensity-based automated registration. We therefore use an intermediate pre-op CT with full FOV to bridge to the MRI
- masking is required to focus the registration algorithm on the structure of interest
- Overall strategy:
- obtain (manual) a coarse segmentation of the liver in both MRI and CT. Dilate by a few pixels to include the organ boundary
- perform a manual initial alignment of MR to CT. Use this alignment as starting point for the automated registration
- run an affine registration with above masks and intial alignment
- run a non-rigid BSpline registration with above affine alignment as starting point
Discussion: Registration Challenges
- large differences in FOV
- strong differences in image contrast between MRI & CT
- contrast enhancement and pathology and treatment changes cause additional differences in image content
- we have strongly anisotropic voxel sizes with much less through-plane resolution
Procedures
- Phase I: Pilot to determine optimal registration parameters
- load reference image and one moving image from the series
- open Registration : BrainsFit module
- Registration Phases:
- set "reference" fixed and "moving_??" as moving image
- select/check Include BSpline registration phase
- Output Settings:
- select a new transform "Slicer BSpline Transform", rename to "Xf1_moving_??"
- select a new volume "Output Image Volume, rename to "moving_??_Xf1"
- Registration Parameters: increase Number Of Samples to 200,000
- Registration Parameters: set Number Of Grid Subdivisions to 5,5,5
- Leave all other settings at default
- click: Apply; (runtime < 10 sec. on MacPro)
- adjust grid size until registration is acceptable
- you can see the commandline text of the registration performed by opening the Window/Error Log window and clicking on BRAINSfit commandline input
- Phase II: Batch Run
- open a terminal window
- via a TextEditor or prototyping/scripting software (e.g. Matlab), copy and modify the prototype line below, by changing only the moving input image:
 /Applications/Slicer36/Slicer3 --launch  /Applications/Slicer36/lib/Slicer3/Plugins/BRAINSFit --useBSpline --splineGridSize 5,5,5 --outputVolumePixelType short /
 --numberOfSamples 200000 --costMetric MMI --fixedVolume Reference/refLung_001.dcm --movingVolume Moving/Moving_001/Moving_001.dcm /
 --bsplineTransform Xforms/Moving_001_XfBSpl5.tfm --outputVolume MovingResampled/Moving_001_r.nrrd >> Logs/Moving_001_RegLog.txt 2>&1
- replace "/Applications/Slicer36" with your path of 3DSlicer
- create result directories MovingResampled, Logs, Xforms
- note that because input image is DICOM, and images are 2D only, each image of the time series must be in its own directory, otherwise Slicer will read them as a volume.
- paste all commands into a terminal window, or copy into a shell script and execute.
- Phase III: Evaluate Transform files
- upon completion, read the transform files with an editor and extract the displacements of interest
- The ITK transform files describe displacements at the grid nodes, many of which are outside the region of interest. Because BRAINSfit pads the grid with 1 voxel, the grid returned is actually 8x8x8. We use only the plane (*,*,4) for analysis and discard the y-direction displacements, which as expected are all zero.
- for details on the ITK transform format see the FAQ here
- To obtain displacements at arbitrary coordinates, interpolate the transform into a deformation field, e.g. using this module (details FAQ here):
/Applications/Slicer3.6.3/lib/Slicer3/Plugins/BSplineToDeformationField
Registration Results
| unregistered MRI & CT | |
| registration masks | |
| manual initial alignment of MRI & CT | |
| affine registered MRI & CT | |
| nonrigid registered MRI & CT |
Download
- Data
- download input image data (Input Data, NRRD images, zip file 42 MB)
- download registration parameter presets file (.mrml file 20 kB)
Link to User Guide: How to Load/Save Registration Parameter Presets
- Results
Acknowledgments
Thanks to Dr.Stuart Silverman and Dr. Nobuhiko Hata for sharing this case.

