Image Registration for MRg Prostate Biopsy
From NAMIC Wiki
Home < Image Registration for MRg Prostate Biopsy
General instructions
- The software components used in this pipeline are not available in the standard Slicer distribution. Instead, the following binary available on opel.bwh.harvard.edu should be used:
/workspace/fedorov/Slicer/Stable-Release/Slicer3-superbuild/Slicer3-build/Slicer3
- log on to opel with X forwarding enabled:
ssh -XY opel
- You are supposed to be familiar with 3D Slicer. If this is not the case, familiarize yourself at least with the tutorials 1, 2, 4 and 5 from Slicer 3.6 training page
WARNINGS
Do not's ...
- do not make slice visible in 3D viewer: this will crash Slicer (this is a known problem specific to SPL fat nodes, there is no solution to fix it right now)
- do not use your home directory for Slicer temporary storage -- it will fill up quickly, and Slicer will not work correctly
Processing Steps
1. Preparation step: start Slicer, load the images (let's say, they are called "preop.nrrd" and "intraop.nrrd"). Do the following:- Contour the object you want to register in both images
- go to Slicer Editor module
- create a new label image
- trace the approximate boundary of the prostate capsule in each image using "Draw" tool (let's say, they are called "preop-label" "intraop-label")
- Perform bias correction on the intraop image
- go to "N4ITK MRI Bias Correction" module
- Parameters: Input image = "intraop" or "preop" image, Mask image = "intraop-label" or "preop-label", Output volume = create new volume and name it "preop-N4"/"intraop-N4"
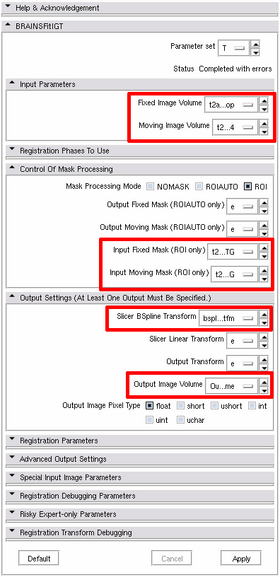
- Choose Registration -> BRAINSFitIGT module
- Parameters: Fixed image volume = "intraop-N4", Moving image volume = "preop-N4", Input fixed mask = "intraop-label", Input moving mask = "preop-label", Slicer BSpline transform = create a new transform and name it "bspline-REG-tfm", Output image volume = create a new volume and name it "preop-REG"
- Upon completion of registration, inspect the result and check if it makes sense
