Projects:RegistrationLibrary:RegLib C12
From NAMIC Wiki
Home < Projects:RegistrationLibrary:RegLib C12
v3.6.3
Back to ARRA main page
Back to Registration main page
Back to Registration Use-case Inventory
Contents
v3.6.3  Slicer Registration Library Case #12: Liver Tumor Cryoablation
Input
|
|
|

|
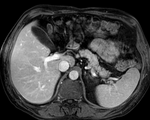
|
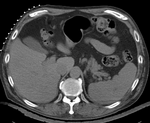
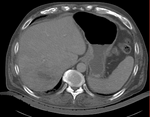
| fixed image/target | intermediate ref. image | moving image |
Modules
- Slicer 3.6.3 recommended modules: BrainsFit
Objective / Background
We seek to align a pre-operative MRI with the intra-operative CT for surgical guidance.
Keywords
MRI, CT, IGT, intra-operative, liver, cryoablation, change detection, non-rigid registration
Input Data
- reference/fixed : pr-op CT, 0.95 x 0.95 x 5 mm voxel size
- moving: intra-op MRI, 0.78 x 0.78 x 2.5 mm axial,
Discussion: Registration Challenges
- large differences in FOV
- strong differences in image contrast between MRI & CT
- contrast enhancement and pathology and treatment changes cause additional differences in image content
- we have strongly anisotropic voxel sizes with much less through-plane resolution
Notes / Overall Strategy
- the intra-op CT is acquired with a clipped FOV (to minimize acquisition time & exposure). This causes difficulty for intensity-based automated registration. We therefore use an intermediate pre-op CT with full FOV to bridge to the MRI
- masking is required to focus the registration algorithm on the structure of interest
- Overall strategy:
- obtain (manual) a coarse segmentation of the liver in both MRI and CT. Dilate by a few pixels to include the organ boundary
- perform a manual initial alignment of MR to CT. Use this alignment as starting point for the automated registration
- run an affine registration with above masks and intial alignment
- run a non-rigid BSpline registration with above affine alignment as starting point
Procedures
- Phase I: Build Masks
- load RegLib_C12 Dataset (e.g. via "RegLib_C12_SlicerScene.mrml"
- go to the Editor module
- Select "CT_preop_contrast" as master volume
- create new labelmap "CT_preop_contrast"
- trace the liver contour from axial slices, or use one of the Segmentation modules (e.g. FastMarching) as starting point
- Save result labelmap
- repeat outlining on the MR image
- In the Editor module, use the Dilate function to expand the outline by 2-3 pixels (click on Apply button 2-3 times)
- save dilated labelmasks under new name (e.g. CT_mask.nrrd)
- Phase II: MR-CTpre registration
- Following the concept of manual registration, create an initial transform that roughly aligns the MR to the pre-op CT. Details and links in the Slicer Registration FAQ
- In the Data module, create a new transform node (right click on Scene node), rename to "Xf1_ManualInit", then drag the image volume inside the registration transform node
- Select the views so that the volume is displayed in the slice views
- Go to the Transforms module and adjust the translation and rotation sliders to adjust the current position. To get a finer degree of control, enter smaller numbers for the translation limits and enter rotation angles numerically in increments of a few degrees at a time
- Affine Registration
- go to BRAINSfit module
- fixed: "CT_preop", moving: "MRI_preop"
- Initialize with transform, select "Xf1_ManualInit"
- select/check the following boxes: Include Rigid...", Include Scale", "Include Affine registration phase
- Output Settings: select a new transform "Slicer Transform", rename to "Xf2_Affine"
- Registration Parameters: increase Number Of Samples to 200,000
- Masking: check "ROI" box
- Input Fixed Mask: select the "CT_preop_mask" generated above
- Input Moving Mask: select the "MR_preop_mask" generated above
- click Apply
- go to BRAINSfit module
- NonRigid Registration
- go to BRAINSfit module
- fixed: "CT_preop", moving: "MRI_preop"
- Initialize with transform, select "Xf2_Affine"
- Output Settings: select a new transform "Slicer BSpline Transform", rename to "Xf3_BSpline"
- select a new volume "Output Image Volume, rename to "MR_preop_Xf3"
- Registration Parameters: increase Number Of Samples to 200,000
- Registration Parameters: set Number Of Grid Subdivisions to 7,7,5
- Masking: check "ROI" box
- Input Fixed Mask: select the "CT_preop_mask" generated above
- Input Moving Mask: select the "MR_preop_mask" generated above
- Masking: check "ROI" box
- Leave all other settings at default
- click: Apply
- go to BRAINSfit module
- Phase III: CT_pre-CT_intra registration
- follow same procedure as for MR-CT registration above
Registration Results
| unregistered MRI & CT | |
| registration masks | |
| manual initial alignment of MRI & CT | |
| affine registered MRI & CT | |
| nonrigid registered MRI & CT | |
| nonrigid registered CTpre to CTintra |
Download
- Data
- download input image data (Input Data, NRRD images, zip file 42 MB)
- download registration parameter presets file (.mrml file 20 kB)
Link to User Guide: How to Load/Save Registration Parameter Presets
Acknowledgments
Thanks to Dr.Stuart Silverman and Dr. Nobuhiko Hata for sharing this case.

