Projects:RegistrationLibrary:RegLib C17
From NAMIC Wiki
Home < Projects:RegistrationLibrary:RegLib C17
v3.6.3
Back to ARRA main page
Back to Registration main page
Back to Registration Use-case Inventory
Contents
v3.6.3  Slicer Registration Library Case #17:
Kidney pre-op MR to intra-op CT
Input

|

|

|
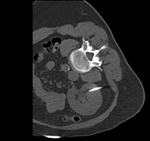
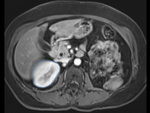
| fixed image/target: intra-operative CT | moving image: per-operative MRI |
Modules
- BRAINSfit
- for mask generation: Draw tool in the Editor and/or Fast-Marching Segmentation,
Keywords
CT, MRI, abdominal, image-guided therapy, IGT, tumor ablation
Input Data
- fixed: intra-operative CT, oblique, 0.58 x 0.58 x 3 mm voxel size, dimensions 512 x 512 x 20
- moving: opre-operative MRI lique, 1.2 x 1.2 x 4 mm voxel size, dimensions 320 x 240 x 64
Registration Challenges
- intra-operative CT is acquired with limited FOV and very oblique position
- intra-operative CT contains artifacts from surgical needles
- both datasets have strong voxel anisotropy
- the region of interest (kidney) is small compared to the FOV, i.e. there is substantial "distracting" image content
Key Strategies
- manual alignment to obtain initial pose
- rough segmentation of both kidneys to mask "distracting" image content
- gradual increase in registration DOF.
Procedures
- Phase 1: obtain masks for kidney ROI
- Use the Draw tool in the Editor and/or use the Fast-Marching Segmentation module to obtain segmentations of the kidney in both CT and MR image. In the example dataset, you can find those segementations as files "Probe1CT_seg.nrrd" and "MRl_seg.nrrd"
- See the tutorials for the Editor and and segmentation methods for details on how to obtain an efficient segmentation.
- Phase 2: obtain initial manual alignment
- Details in the manual registration tutorial and also in the Slicer FAQ
- go to the Data module
- right click on the "Scene" mode and select Insert New Transform. In the MRML edit field below, rename it to "Xf0_manual" or similar
- In the Data module, drag the "MRI" image volume inside the"Xf0_manual" node
- Select the views so that the MR and CT volumes are displayed in the slice views
- Go to the Transforms module and adjust the translation and rotation sliders to adjust the current position. To get a finer degree of control, enter smaller numbers for the translation limits and enter rotation angles numerically in increments of a few degrees at a time
- Phase 3: automated rigid/affine alignment
- Go to the BRAINSfit module
- select Presets "Xf1_Rigid" or "Xf2_Affine" or set the parameters as given below:
- fixed image: "Probe1CT", moving image: "MRI"
- Initialize with previous transform: select "Xf0_manual" from Phase 1 above
- Initialize Transform Mode: leave at default = OFF
- check Include Rigid registration Phase box. For affine also check ScaleVersor3D and Affine
- Output: under Slicer Linear Transform, select new and rename to "Xf1_Rigid" or "Xf2_Affine" or similar
- Registration Parameters: set "Number of Samples" to 100,000 at least
- Mask Processing: check ROI box, Input Fixed Mask select CT segmentation created in Phase 1 above. For Input Moving Mask select MRI segmentation created in Phase 1 above.
- Click Apply
- return to the Data module and drag the MRI inside/outside the different registration transforms to compare the alignment
- to obtain a resampled volume: move MRI inside Xform of choice and then right-click on the volume and select Harden Transforms. Save MRI under new name.
Registration Results
 original unregistered
 after manual initial alignment
 after rigid registration
 after affine registration